The Consensus Outlook Add-in takes several feature elements available within Consensus Snap and builds them right inside of Outlook. This article will walk through Installing and Using this Add-in
Using the Consensus Outlook add-in allows Users to send DemoBoards directly from Outlook. In this article, we will cover the installation, configuration and how to create DemoBoard links right inside of Outlook
Installing and Configuring the Consensus Outlook Add-in
You can find the Consensus Outlook add-in right in the Microsoft App Store here. 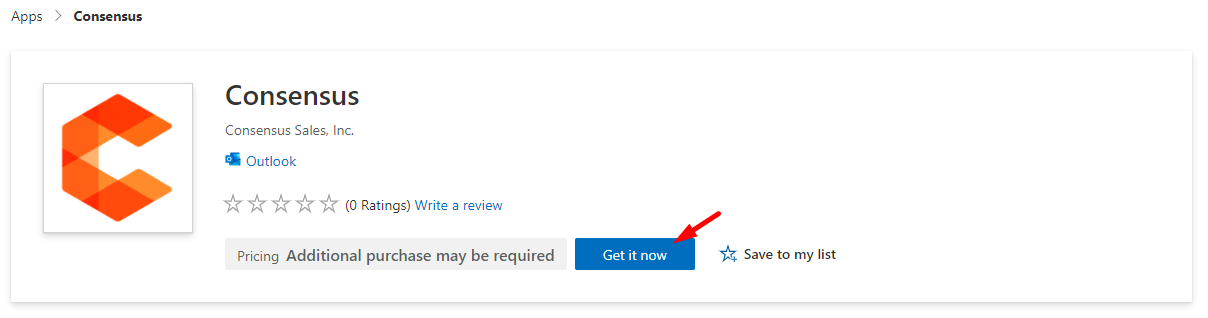
NOTE* When you install an add-in in Outlook.com, it will appear in other versions of Outlook as well. For example, if you install an add-in in Outlook.com, you will see the add-in when you open Outlook.
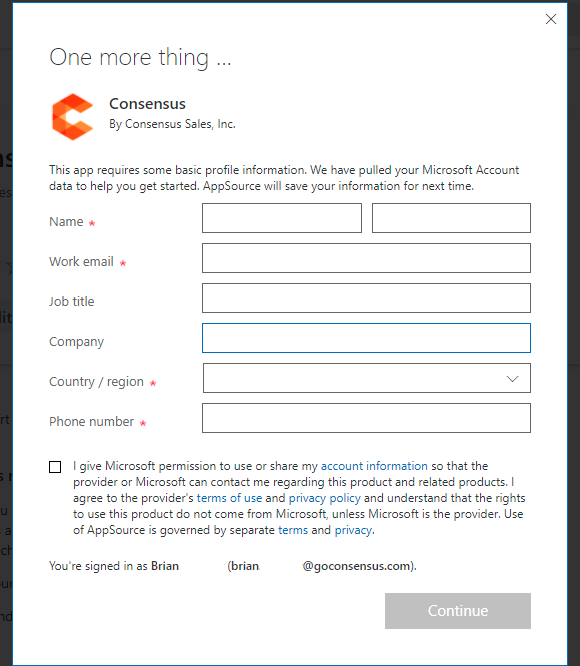
- Select "Get it now" and fill out the needed profile information
- Once you select Continue it will bring you to the Admin Center where you can determine how you want install the Add-in for your Organization
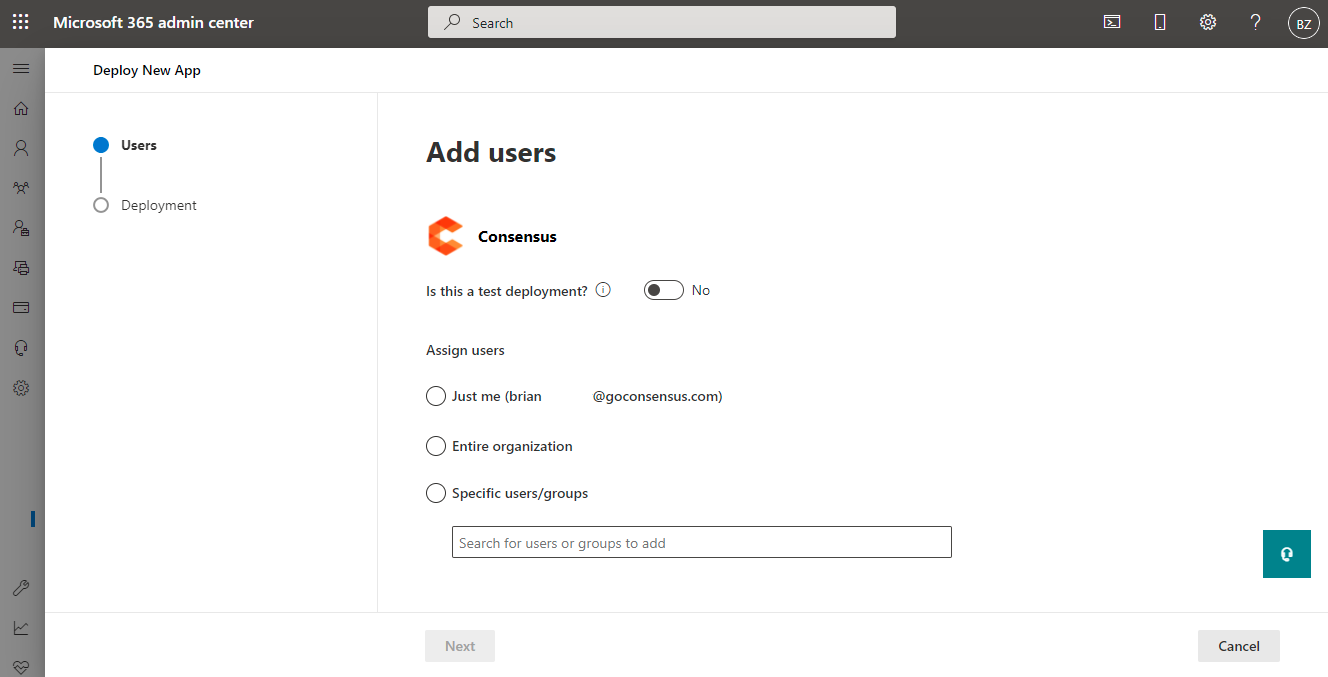
- Determine who you want to Assign the Add-in to then select 'Next'
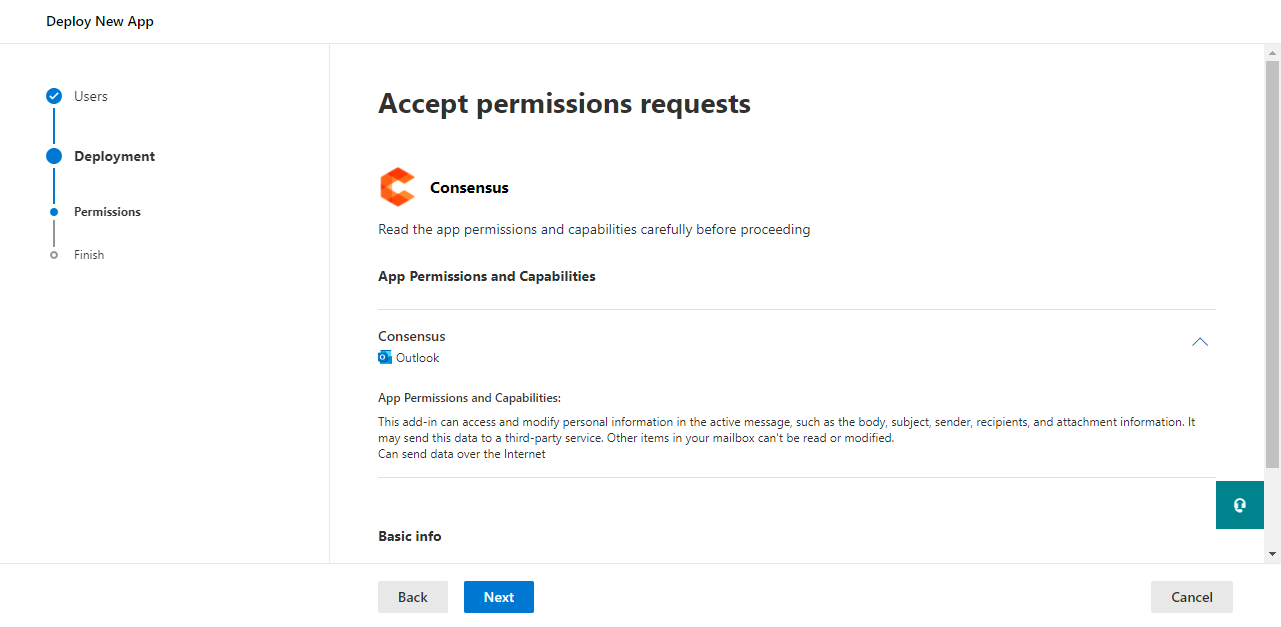
- Review and Accept the Consensus Add-in permissions by selecting 'Next'
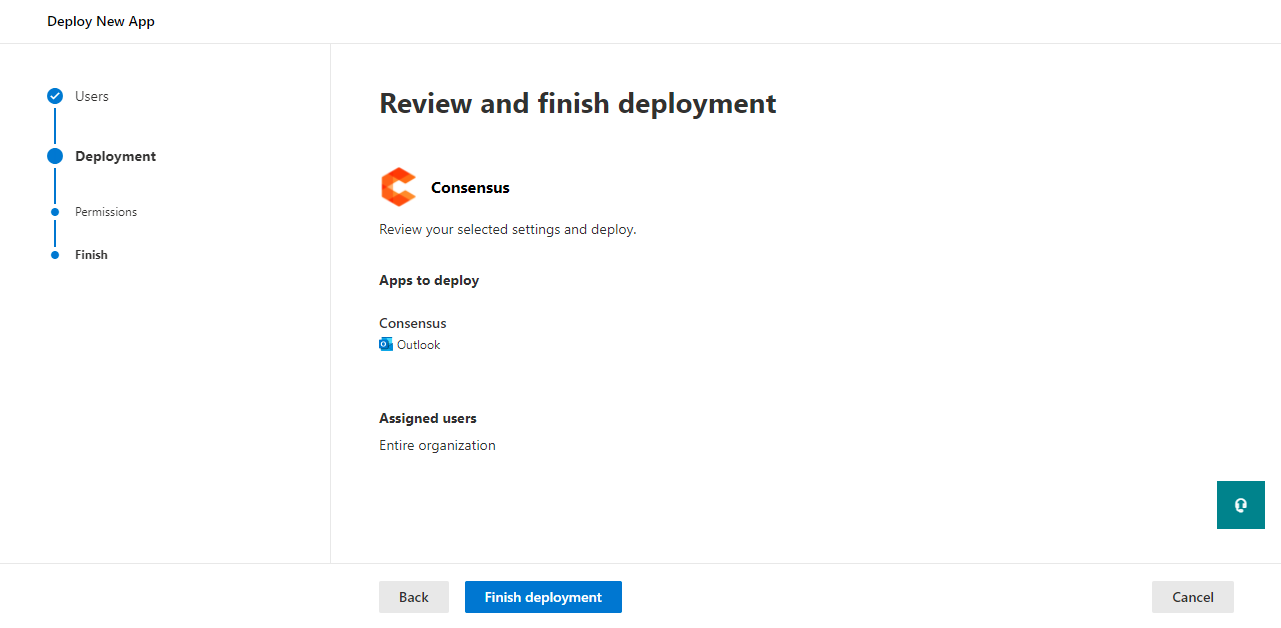
- Then Review and finish deployment by clicking 'Finish deployment'
- Once deployed you will see the green checkmark next to Outlook. Click 'Done' to exit the Deployment completed page.
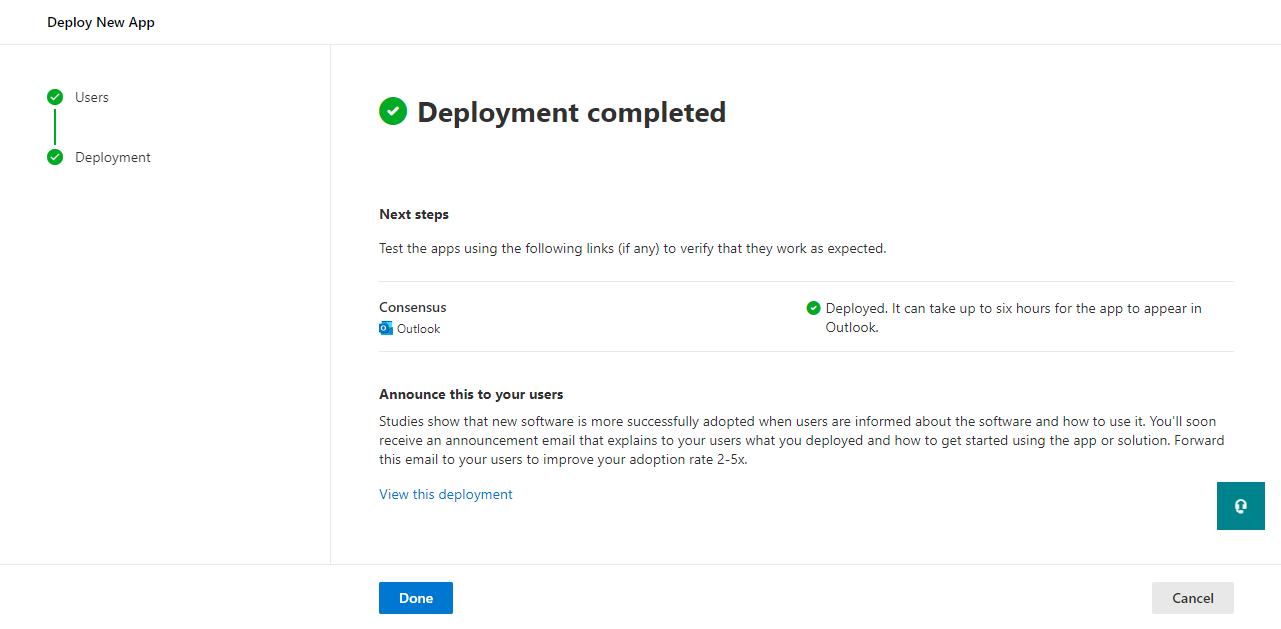
Note* It can take up to six hours for the app to appear in Outlook according to Microsoft
Once the installation is complete, open Outlook. If Outlook is already open, you will need to close and re-open it. Once opened, you will notice the Consensus plugin at the top left-hand corner.

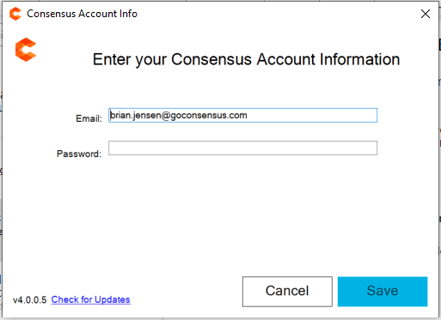
Click the Consensus Send Demo which will prompt you to add your Consensus email address and password. Enter your Consensus Credentials and click Sign In.

You are now connected to Consensus and ready to use the Add-in to send out unique DemoBoard links right from inside of your Outlook!
Creating DemoBoard links with the Consensus Outlook Add-in
Now that you have installed and configured the Consensus Outlook Add-in, you can easily create DemoBoard links for the recipients within your emails. Below we will walk you through the process of creating a DemoBoard for your email recipients with some Tips and Tricks along the way!
- Start by Creating your Email (whether that is a New Email or a Response [
 ] to an existing email thread)
 - Add the recipient(s) you want to be invited to the DemoBoard within the 'To' Field
- Consensus will automatically add these recipients to the Recipient Invite list when you create the DemoBoard, so you don't have to do it manually.
- TIP* Make sure the recipients are known Contacts within your Outlook so we can pull in their First & Last Names automatically for you too!
- Learn how to add a recipients to your Contacts list here
- Anyone added to the CC or BCC fields will not automatically be included within the DemoBoard invite
- TIP* This is a great way to add other Team members on your email without them being added to the DemoBoard invite link.
- TIP* This is a great way to add other Team members on your email without them being added to the DemoBoard invite link.
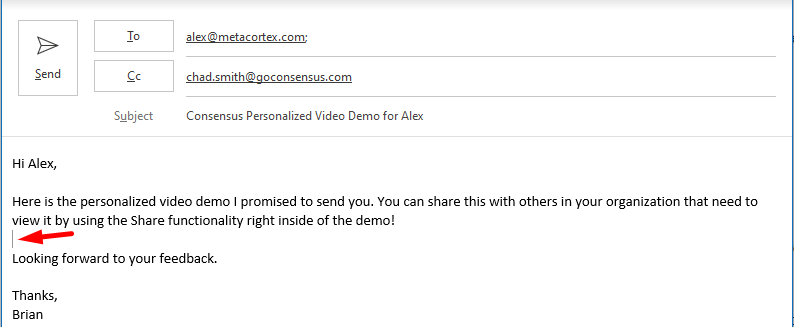
- Now fill out the Subject and Body of your Email
- TIP* We recommend using terms like 'Personalized Video Demo For' or other terms denoting the unique experience they will have with your Consensus Demo. This helps drive interest and click-through rates!
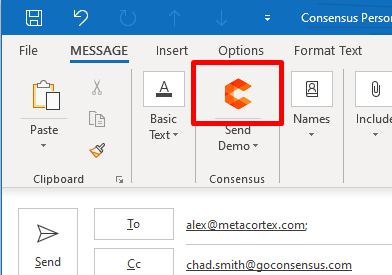
- Once you have the Subject and Body ready to go, place your Cursor where you want the DemoBoard link to appear
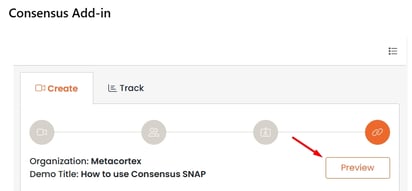
- Now select the Consensus Icon to initiate the Consensus Outlook Add-in. This will bring up the modal where you can create the DemoBoard for your recipient(s)
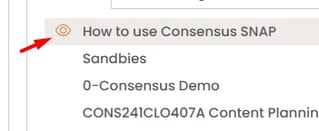
- The first step is selecting which Demo you want to use within your DemoBoard invite
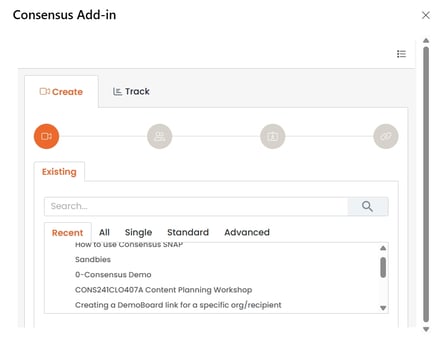
- Use 'Search' or Demo Type options to narrow your search to find the Demo you are looking for
- Hover over the Demo Title to see a Preview eye icon you can click to watch a Sales Preview of the Demo (This will open up in your browser)
- Selecting the Demo will jump you to the next step (Recipients info)
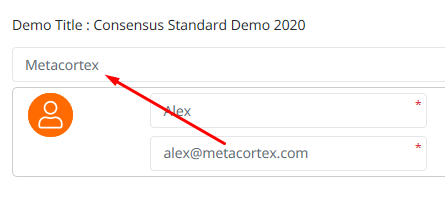
- Next, make sure all of the recipients you want included within the DemoBoard invite are listed.
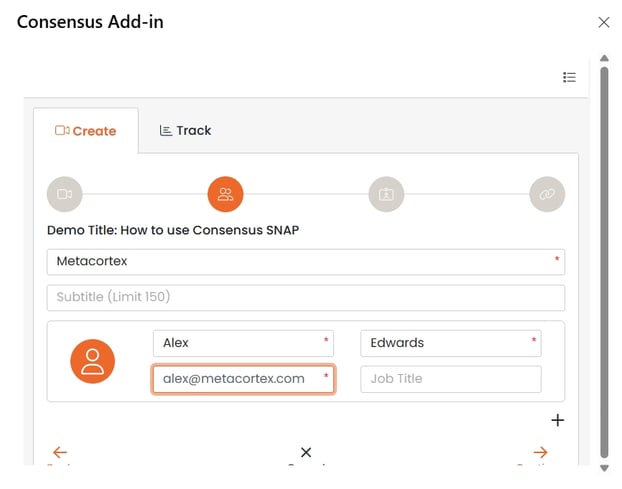
- Consensus will Populate the Organization field based on the email domain of the first recipient
- You can add additional Recipients here that you want to be part of the DemoBoard here as well.
- Note* These recipients will not be added to your email
- Once your recipient info is set, select Continue to go to the final Step
- Consensus will Populate the Organization field based on the email domain of the first recipient
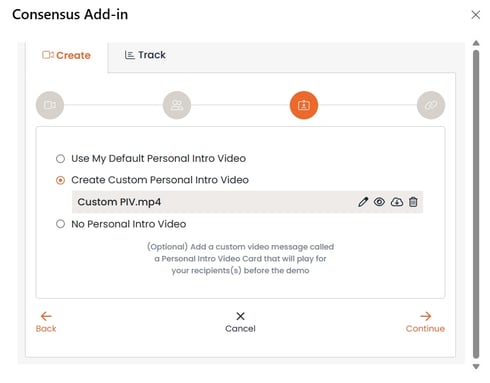
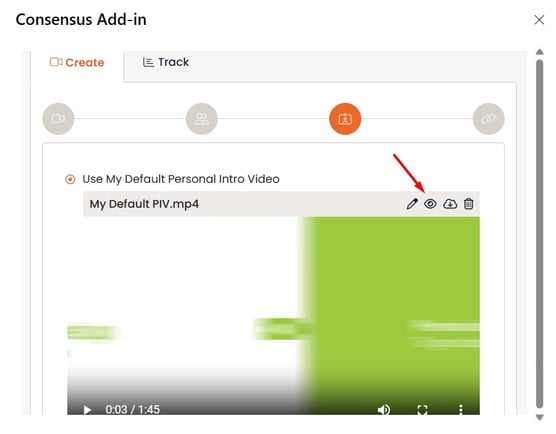
- In the next step, you can add a Personal Intro Video (PIV) to your DemoBoard.*
- NOTE* Your User must have Personal Intro Video enabled to see this step.
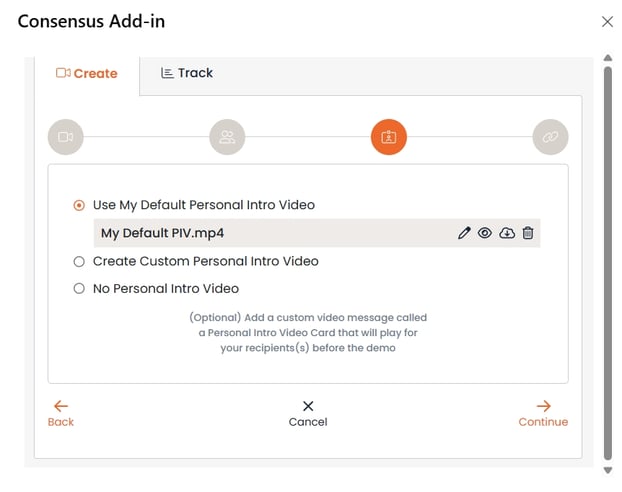
- If you have an existing Personal Intro Video, the Add-in will use it by default. Use the Preview Icon (
 ) to review your PIV before you send it!
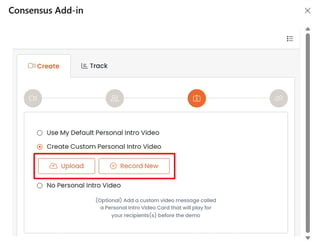
- You can also create a custom PIV for your DemoBoard
- Select 'Create Custom Personal Intro Video and then click 'Upload' or 'Record New'
- 'Record New' will bring you to the PIV Plugin page where you can Record or Upload your PIV
Note* Recording is only supported through browsers using chromium (i.e. Google, Edge). Set your Default browser to one of these to take advantage of the recording feature.- After recording, you will have a change to Trim your Custom Intro Video as well as set a Title for it.
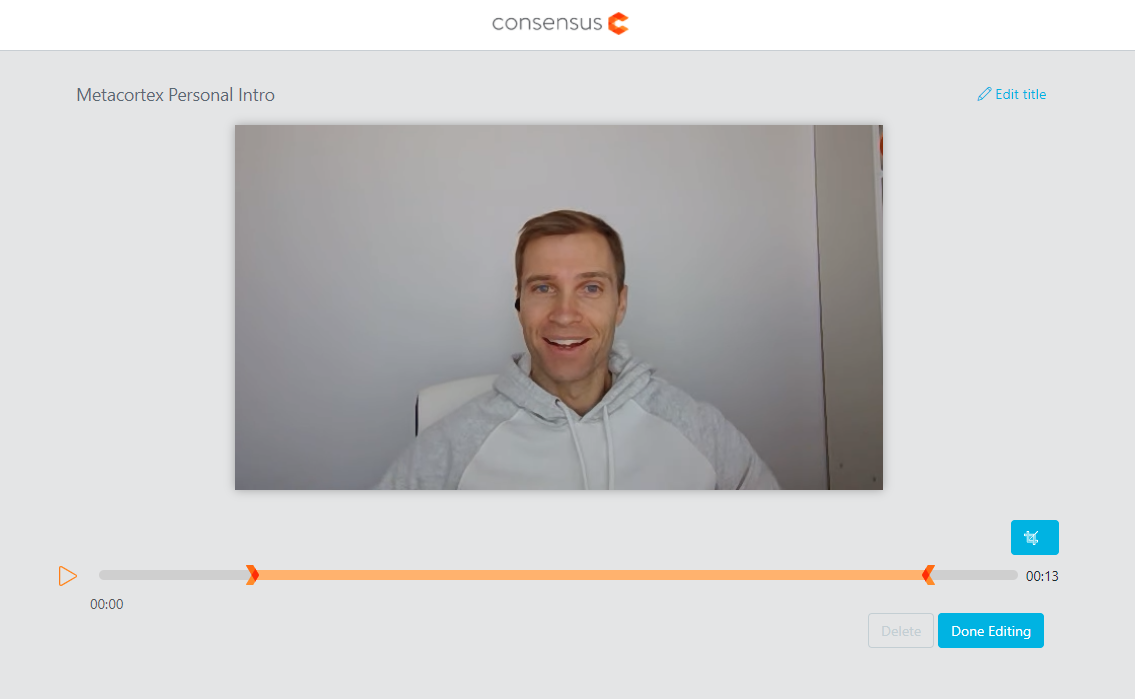
- Once everything is set, simply click on 'Done Editing' and your Custom Intro Video will save in Consensus and show within the Intro Video step.
- After recording, you will have a change to Trim your Custom Intro Video as well as set a Title for it.
- Select 'Create Custom Personal Intro Video and then click 'Upload' or 'Record New'
- If you don't want to use the PIV feature, simply select to not include a PIV within the DemoBoard
- If you have an existing Personal Intro Video, the Add-in will use it by default. Use the Preview Icon (
- The final step is to determine which Link Type you want to insert within your email
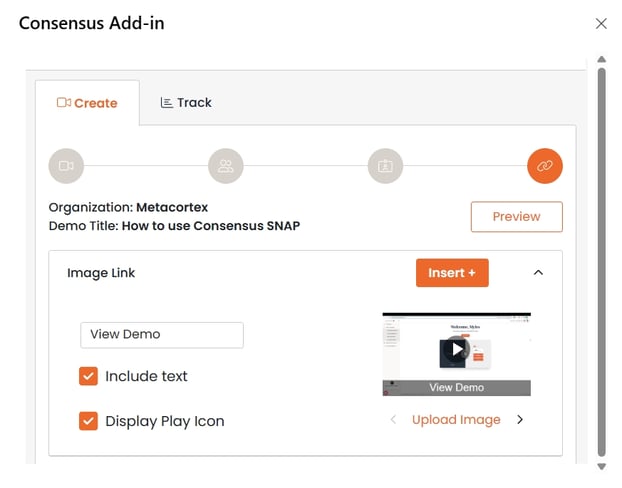
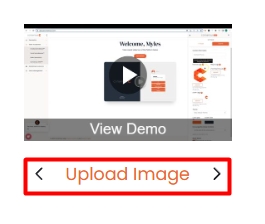
- Image Link - The image link grabs frames from the first video within your demo to create an image thumbnail. You can adjust the text shown within the thumbnail as well as determine if you want the Display icon to show or not
- TIP* Click to arrow under the image to select from different frames within your demo video or you can upload your own thumbnail by selecting 'Upload Image'
- TIP* Click to arrow under the image to select from different frames within your demo video or you can upload your own thumbnail by selecting 'Upload Image'
- Image Link - The image link grabs frames from the first video within your demo to create an image thumbnail. You can adjust the text shown within the thumbnail as well as determine if you want the Display icon to show or not

-
-
- Button Link - This allows you to build a button you can include within your email that will by hyperlinked to your DemoBoard.
-
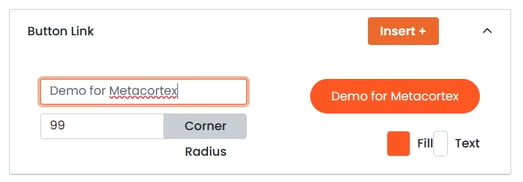
- TIP* Adjust the button text, corner radius, along with the fill and text color to personalize the button as needed!
-
- Button Link - This allows you to build a button you can include within your email that will by hyperlinked to your DemoBoard.
-
-
-
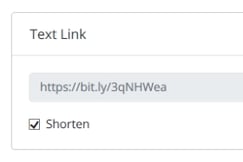
- Text Link - This allows you to insert the actual URL text for the DemoBoard invite.
a.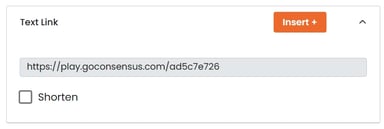
- TIP* Select shorten to convert your link into a bit.ly link
- TIP* Select shorten to convert your link into a bit.ly link
- Adjust Additional DemoBoard Options
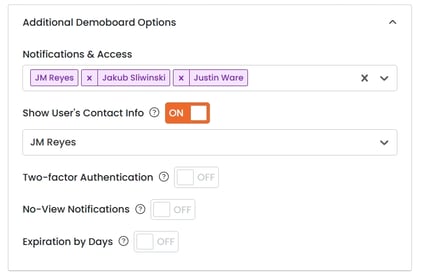
- Add other Users in your Account to the Notifications & Tracking list and determine if and whose Contact Info to show within the DemoBoard.
- PRO TIP* click on the Preview button to see a Preview of this DemoBoard
- Text Link - This allows you to insert the actual URL text for the DemoBoard invite.
- Click Insert! Once you have the link style you want to include in your email all set, simply click Insert and the link will be inserted right where you cursor was placed.
-
Your Email is now set with the unique DemoBoard link for your recipient(s)!
- TIP* You can adjust the size of the image by selecting it and then dragging one of the circles on the corners.

Outlook Permissions
The Consensus Outlook Add-in requires permissions from both Outlook and your OS to use it at its full functionality. Below is a review of what permissions are needed:
- Outlook
- Edit Email Body
- This permission allows the Add-in to insert the DemoBoard link directly into the email body. It ensures a seamless experience by automatically embedding the necessary information into your emails.
- This permission allows the Add-in to insert the DemoBoard link directly into the email body. It ensures a seamless experience by automatically embedding the necessary information into your emails.
- Read/Write TO Field
-
Read TO Field: The Add-in reads the TO field to automatically include these recipients and pass them to the DemoBoard for simplification creating process.
-
Write TO Field: The Add-in adds any additional recipients specified during the DemoBoard creation process to the TO field, facilitating smooth communication.
-
- Edit Email Body
- OS
- File System Access
- This permission is required to upload assets such as the Personal Intro Video for your DemoBoards. It does not grant unrestricted access to your entire file system. The Add-in only interacts with files specifically chosen by the user for upload.
- This permission is required to upload assets such as the Personal Intro Video for your DemoBoards. It does not grant unrestricted access to your entire file system. The Add-in only interacts with files specifically chosen by the user for upload.
- Mic, Camera, and System Screen Access
- These permissions are necessary for recording Personal Intro Videos. The Add-in accesses your microphone and camera solely to create these videos and does not use these devices without your explicit initiation.
- File System Access
Addressing Security:
Regarding File System Access opening up the entire hard drive, it's important to note the following:
-
Restricted Access: The Add-in only has access to files you specifically select for upload. It does not have blanket access to your entire file system.
-
User Control: You have full control over what files are uploaded and shared.
Troubleshooting
Below are some of the common issues you may run into as you are using the Consensus Outlook Add-in. Just follow the included instructions and you'll be on your way!
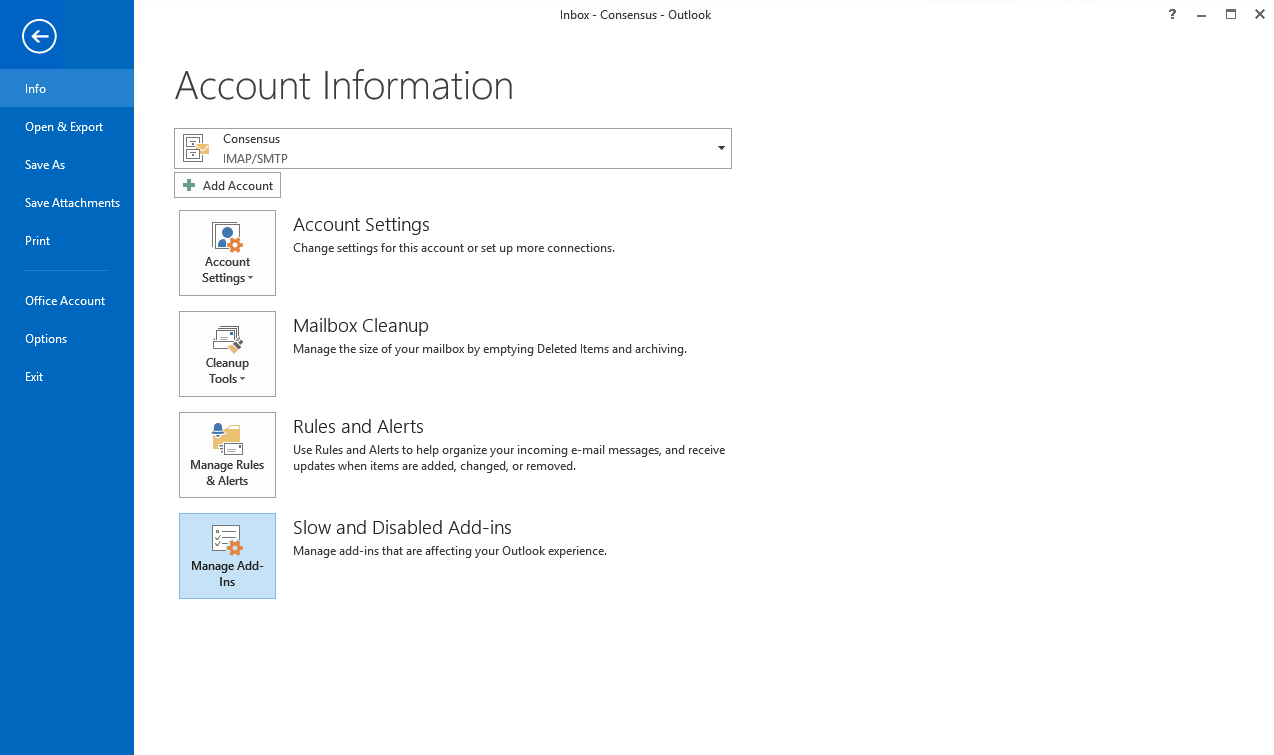
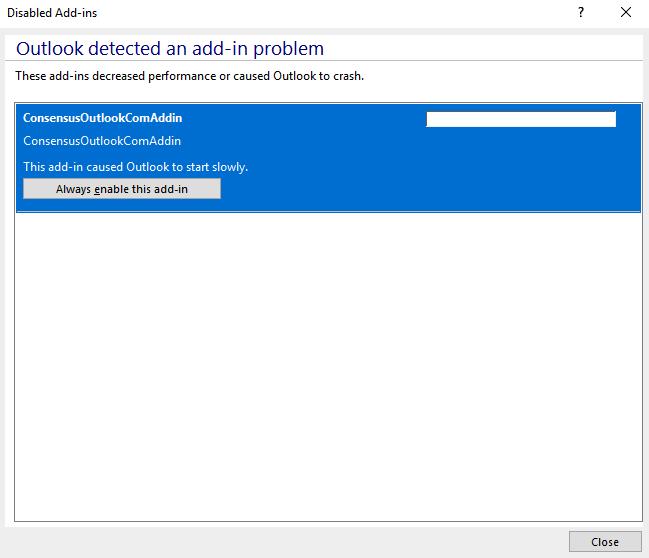
Plugin Disabled
If you see "Plugin was disabled because it was slow to load", please follow these steps. Outlook expects plugins to load under a second. In our testing, the Consensus plugin loads within a second to 1.5 seconds.
In Outlook, click File, then in Info click Slow and Disabled Add-ins.
On the next screen, click Always enable this add-in.
API Error Message
If you run across an API error message, this typically means the token used to remember your User has expired or was somehow removed. To update the token you will simply need to log back in through the Consensus Outlook Add-in
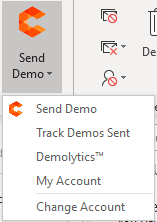
- Click on the drop-down underneath the Consensus icon within the Add-in
- Select 'Change Account' to go into the Credentials page of the Add-in
- Re-enter your credentials and then select 'Save'.
You have now created a new token and the add-in should work as expected.
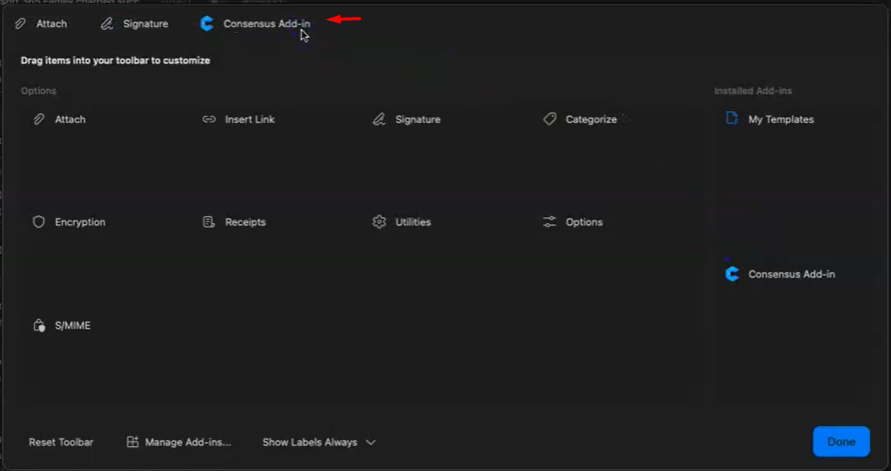
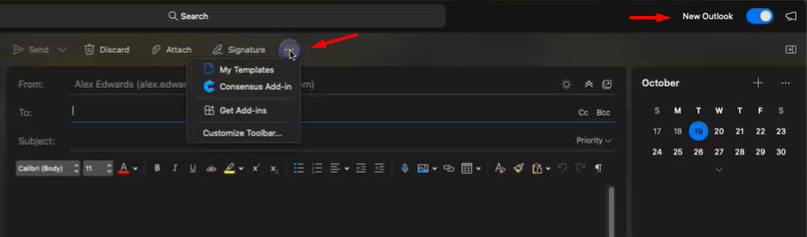
Add-in Not Showing
Installed the Consensus Add-in but can't seem to find it anywhere? This is most likely caused by your Toolbar being minimized. You can resolve this issue in a couple of different ways:
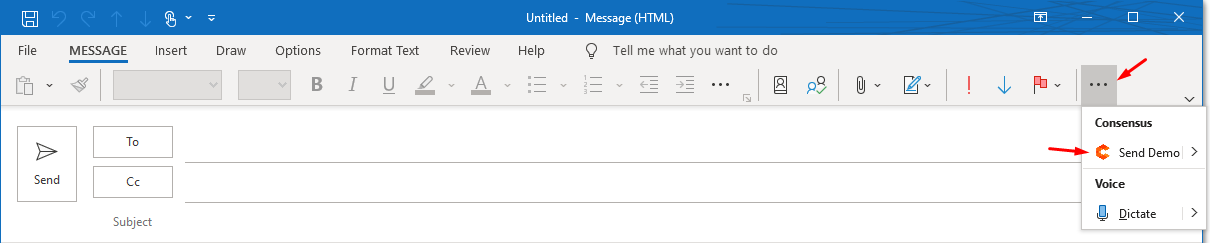
- You can maintain the minimized Toolbar and still use the Consensus Add-in. Simply select the ellipses (
 ) at the end of the tools within the Toolbar to show the Add-in within the dropdown:
- Within the main Outlook App

- Within Compose Email
- Within the main Outlook App
- You can maximize the Toolbar at which point you will be able to see additional Add-ins without needing to select the ellipses option within the minimized view. Simply click the down arrow (
 ) on the far right side of the Toolbar to switch between minimized and maximized Toolbars:
- Within the main Outlook App

- Within Compose Email

- Within the main Outlook App
Using the New Outlook? You can find the Consensus Add-in within the additional options menu by selecting the triple dots (...)
- NOTE* Pin the Consensus Add-in to the Toolbar by selecting "Customize Toolbar" then dragging the Consensus Add-in into the Toolbar at the top of the modal.