
Talkables let your content do the work: answering buyer questions in real time, qualifying their needs, and guiding them toward the next step. With Talkables in Consensus, there is no context switching, no hunting for videos or attachments. Every interaction is captured and surfaced back to your team as meaningful engagement data.
A Talkable is a live AI agent placed over your content. Here's what that means:
- Instead of hoping a buyer reads the whole thing, Talkables helps them find the part that matters most to them
- It collects actual buyer signals and zero-party data while they're most engaged
- Content becomes an agent: educating, qualifying, and and delighting buyers automatically.
The AI inside a Talkable can:
- Answer follow-up questions from the buyer in real time
- Qualify the buyer's role and needs
- Handle objections automatically
- Surface relevant next steps
Each Talkable in your library has:
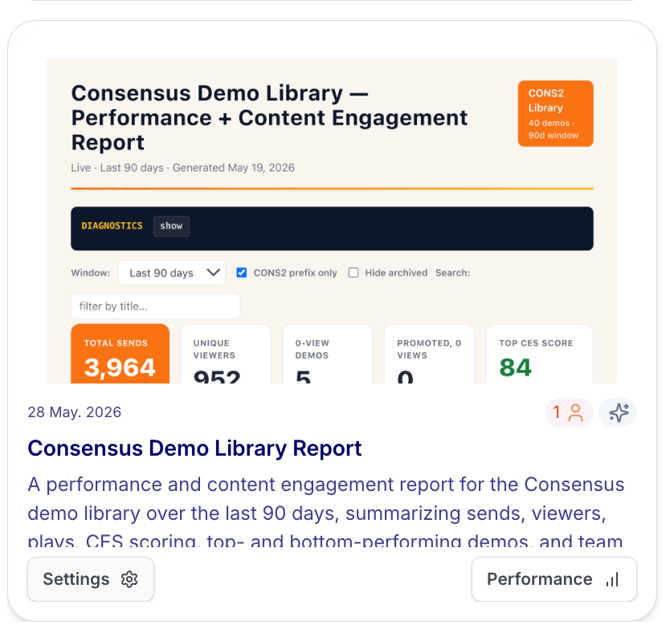
- A name (e.g., "Consensus Demo Library Report")
- A status: Active, Draft or Archived
- Settings, Performance and Share quick actions from its library card
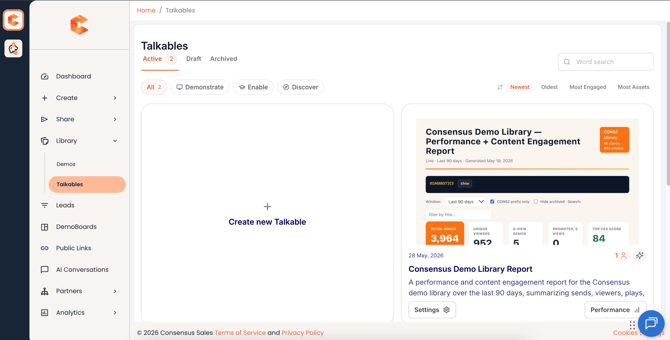
The Talkables library showing Active talkables
What is a Conversation?
A Conversation is defined as one interaction with a Talkable, regardless of how many back-and-forths happen within it. Each time a buyer engages with a Talkable counts as one Conversation. This is the unit used for billing and analytics.
What Your Buyers Experience
When a buyer opens one of your Consensus demos, they'll see Talkable content appear as clearly labeled links alongside your videos and tours in the demo playlist panel.
When the buyer clicks a Talkable link, it opens in a new browser tab where they get:
- A fully interactive document with slide or page navigation
- An AI agent ready to answer their questions, right in the content
- A "Back to Demos" button in the top-right corner to easily return to the demo player
- A toolbar at the bottom with settings, highlights, chat and more
|
Good to know In the current version, Talkables open in a new tab when a buyer clicks. Your buyers can always use the "Back to Demos" button to return to where they were. |
Getting Started: Creating Your First Talkable
Creating a Talkable takes just a few minutes. Here's how:
- Go to Library → Talkables in the left navigation.
- Click Create new Talkable.
- Upload your PDF or video. The AI will automatically scan and label the content, identifying text blocks, figures, tables and key mentions.
- Review the AI-labeled areas in the canvas and adjust anything that needs refining.
- Work through the 5-step setup checklist (detailed below).
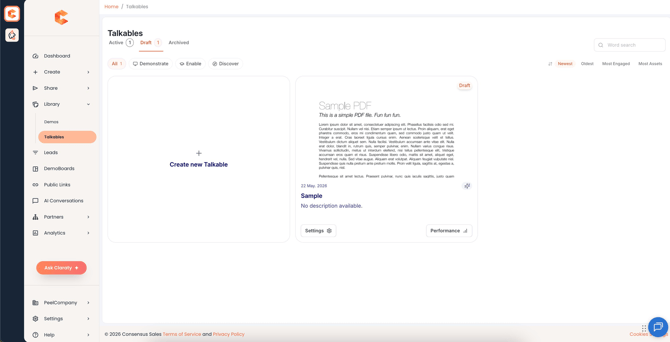
Work Through the Setup Checklist
|
1 |
Intro & Objectives Define the use case, opening message, and what you want to learn from buyers. |
This step sets the foundation for how your AI agent will behave throughout the Talkable.
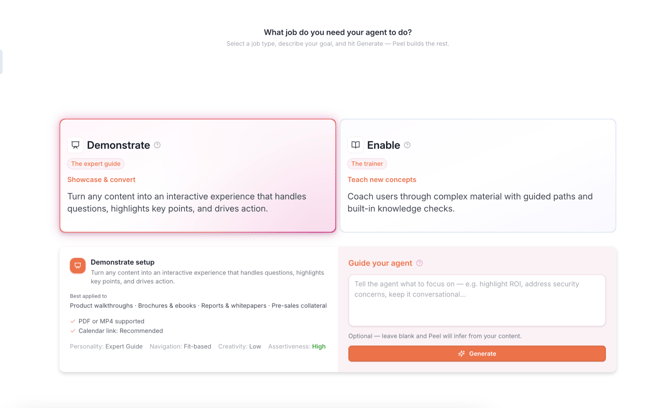
Step 1: Intro & Objectives - define learning objectives and opening statement
Use Case
Choose the scenario that best matches what this Talkable is for. The use case shapes the agent's initial behavior and framing. The default is Custom and you can edit the initial prompt directly by clicking "Edit initial prompt".
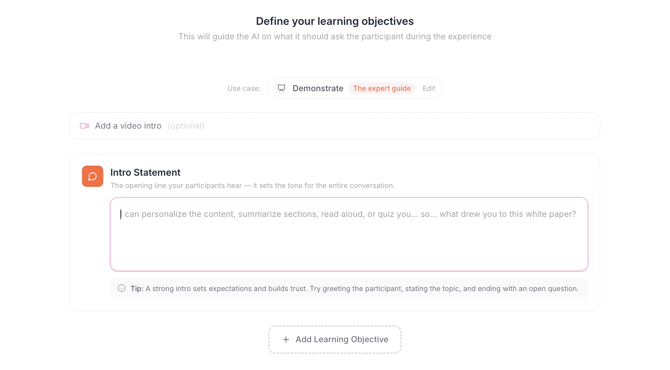
Intro Statement
This is the opening line your buyers will hear when they open the Talkable. It sets the tone for the entire conversation. Keep it warm, inviting and relevant to the content. Example:
"I can personalize the content, summarize sections, read aloud or quiz you… so… what drew you to this white paper?"
Intro Video or Audio Greeting (Optional)
Plays an optional greeting before the AI conversation connects - ideal for adding a warm human touch. You can upload an MP4, WebM, MP3 or WAV file (max 100MB) or paste a Loom share link directly.
|
2 |
Conversational Design Fine-tune the personality, voice and behavior of your AI agent. |
This is where you shape how your agent comes across to buyers. There are two layers: main design settings and advanced configuration.
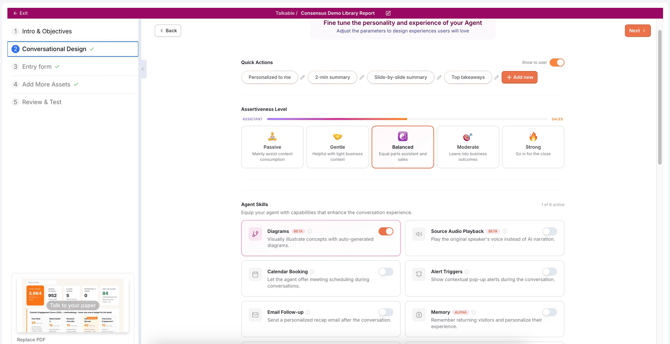
Step 2: Conversational Design - agent skills, assertiveness level, and quick actions
Quick Actions
Quick Actions are pre-built prompts buyers can tap to fast-track their experience. They appear in the buyer-facing conversation interface when "Show to user" is toggled on. Defaults include:
- Personalized to me
- 2-min summary
- Slide-by-slide summary
- Top takeaways
Edit existing actions or click + Add new to create custom ones.

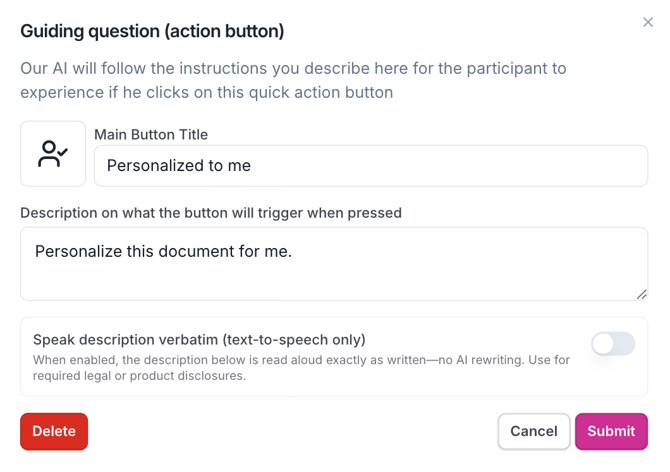
Editing a Quick Action
When you click the edit (pencil) icon on any Quick Action, a modal opens where you can configure exactly what that button does:
- Main Button Title - the label the buyer sees on the button
- Description on what the button will trigger when pressed - the instruction your AI agent will follow when the buyer clicks the button. This is essentially a prompt sent to the agent on the buyer's behalf.
- Speak description verbatim (text-to-speech only) - when enabled, the description is read aloud exactly as written, with no AI rewriting. Use this for required legal or product disclosures.
Assertiveness Level
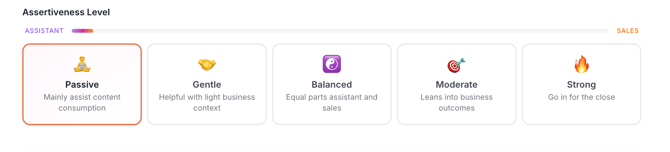
Set how sales-oriented your agent should be on a spectrum from assistant to closer:
- Passive - mainly assists content consumption
- Gentle - helpful, with light business context
- Balanced - equal parts assistant and sales (recommended default)
- Moderate - leans into business outcomes
- Strong - go in for the close
Agent Skills
Equip your agent with additional capabilities. Toggle any of the following on or off.
- Diagrams (BETA) - visually illustrate concepts with auto-generated diagrams
- Source Audio Playback (BETA) - play the original speaker's voice instead of AI narration
- Calendar Booking - let the agent offer meeting scheduling during conversations
- Alert Triggers - show contextual pop-up alerts during the conversation
- Email Follow-up - send a personalized recap email after the conversation
- Memory (ALPHA) - remember returning visitors and personalize their experience
- Expressive Voice (ALPHA) - emotionally intelligent speech with improved turn-taking
- Business Email Extraction (ALPHA) - automatically enrich prospect profiles from email domain
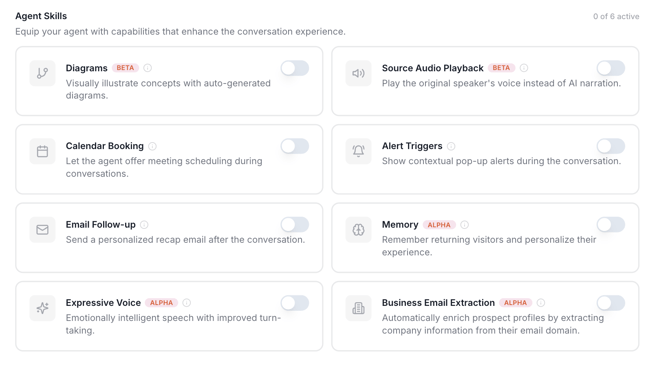
Agent Skills options
Voice
Choose the voice persona your AI agent will use. Four options are available, each in Male or Female. Click "Try it out" to preview before selecting:
- Energetic - enthusiastic and upbeat
- Chill - relaxed and conversational
- Wise - measured and authoritative
- Funny - light and playful
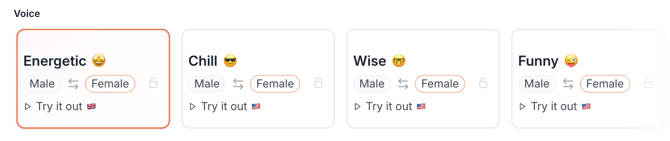
Voice selection and background music options
Background Music
Optionally add ambient music to the buyer experience:
- No music - neutral, clean
- Flow state - calming
- Frequencies - white noise
- Meditation - soothing
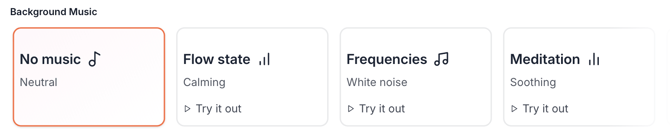
Background music
Advanced: Conversation Configurations
- Speed & Quality - toggle on for faster responses (enabled by default)
- Toolbar Orientation - switch between horizontal and vertical toolbar layout
- Hide Share Button - hides the Share button from the participant toolbar
- Require Microphone Access - if enabled, text mode is hidden and users who deny mic access are declined
- Allow Featured Asset Download - lets participants download the featured PDF
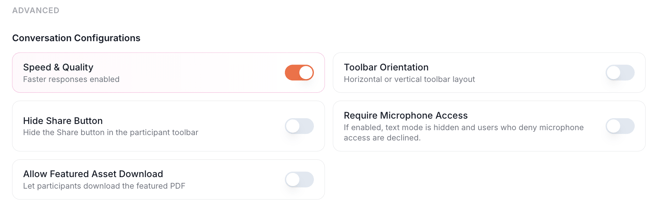
Advanced: Conversation Configurations and Special Agent Instructions
Special Agent Instructions
Use this free-text field to guide the agent's behavior for regulated industries or sensitive topics (healthcare, financial services, legal). Use directive language: "Never make claims about X" not "Be careful about X." For most Talkables, the company settings and knowledge base are sufficient.
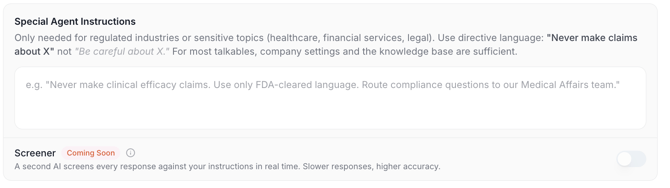
Custom Fit Score
Override the default org-level Fit Score criteria for this specific Talkable. Useful when a Talkable targets a different audience or ICP than your default settings.

|
3 |
Entry Form Set up the buyer-facing welcome screen and data collection gate. |
The Entry Form is the welcome screen your buyers see before the Talkable content loads. It collects their information and sets the stage for a personalized experience.
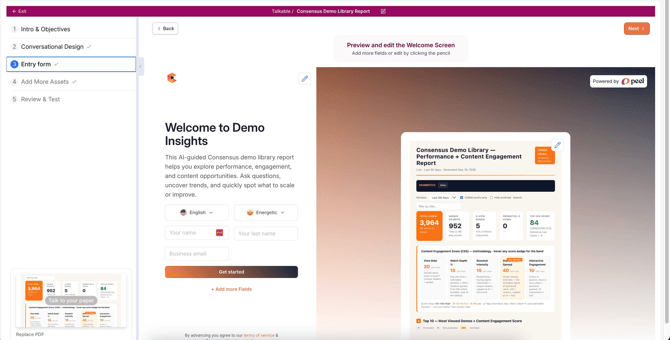
Step 3: Entry Form - preview of the buyer-facing welcome screen
The builder shows a live preview of the buyer-facing screen, which includes:
- Your company logo (top left)
- A welcome title and description - editable by clicking the pencil icon
- Language selector - buyers can choose their preferred language
- AI persona selector - buyers can choose the agent voice/style
- Name and email fields
- A "Get started" CTA button
- "Powered by Peel" badge (top right)
Click + Add more Fields to collect additional information from buyers before they enter.
|
Pro tip The Entry Form is your first impression. Make the welcome title and description specific to the content - buyers are more likely to engage when they immediately understand what's in it for them. |
|
4 |
Add More Assets Enrich your Talkable with additional content and downloadable files. |
Boards let you connect decks, videos and docs into one interactive experience. In this step you can bring in supporting assets beyond your primary document.
Adding Assets
Three ways to add assets to the interactive experience:
- Click to upload or drag and drop - PDFs or videos; multiple files supported
- Add from library - select existing assets already in your Consensus library
- Add a website as an asset - paste a URL to convert a web page into an asset
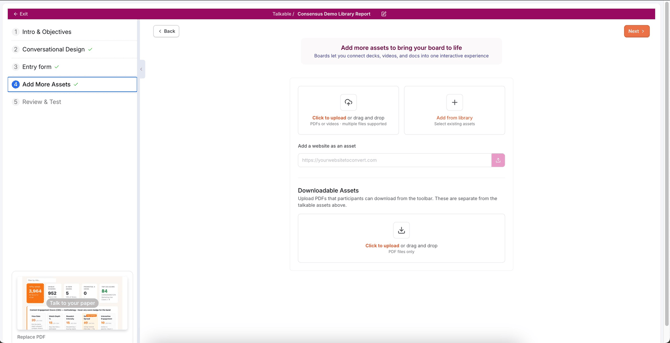
Step 4: Add More Assets — upload, add from library, or link a website
Downloadable Assets
Separately, you can upload PDFs that participants can download directly from the Talkable toolbar during their session. These are distinct from the interactive assets above — they're static files for the buyer to keep.
- Format: PDF files only
- Upload: via click or drag and drop
|
Good to know Downloadable Assets appear in the buyer's toolbar as a download option, great for leaving buyers with a tangible takeaway like a one-pager or pricing sheet. |
|
5 |
Review & Test Verify AI-labeled content and preview the full buyer experience before publishing. |
Before publishing, the builder asks you to verify the content that the AI has automatically labeled across your document. The quality of these labels directly affects how well the AI agent understands and talks about your content.
The Canvas
The main canvas shows your document pages with the AI's labeled regions highlighted in numbered pink bounding boxes. Each box corresponds to a piece of content the AI has identified and categorized.
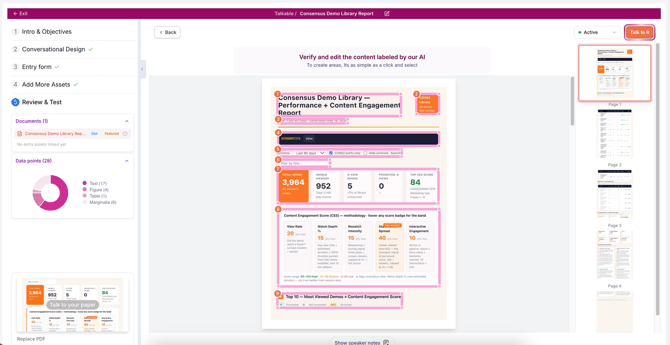
Step 5: Review & Test — AI-labeled regions highlighted in numbered pink bounding boxes
Data Points
A data points summary in the left panel shows the total number of labeled elements and their breakdown by type: Text, Figure, Table, and Marginalia. This gives you a quick sense of how much content the AI has indexed.
Editing Labels
To create or adjust a labeled area, click and drag to select any region on the canvas. This gives you full control to correct anything the AI may have missed or mislabeled.
Page Navigation
A thumbnail strip on the right side of the canvas shows all pages in your document. Click any thumbnail to jump to that page and review its labels.
Talk to It
Once you're satisfied with the labels, click the "Talk to it" button (top right, orange) to have a live test conversation with your Talkable before sharing it with buyers. This is the best way to catch anything the AI misunderstood.
Publishing
When you're ready to go live, use the status dropdown in the top right to switch from Draft to Active. You can also switch between Active, Draft and Archived at any time.
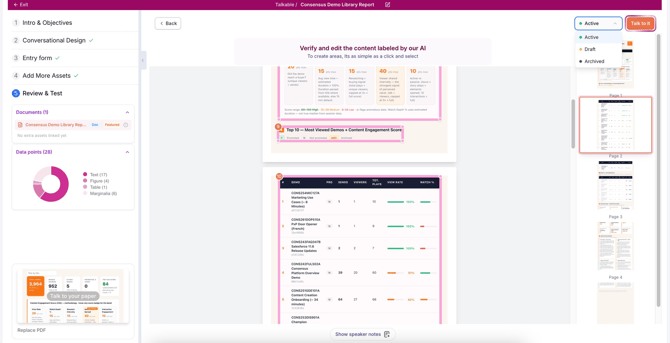
Status dropdown — switch between Active, Draft, and Archived at any time
|
Before you publish Use the Talk to it button to have a real conversation with your Talkable - ask it the kinds of questions your buyers would ask. This is the best way to catch anything the AI misunderstood before your buyers see it. |
PDF Optimization
In the Talkable configurations (Settings gear icon from the library card → PDF tab), you can optimize your PDF for faster loading and better performance.
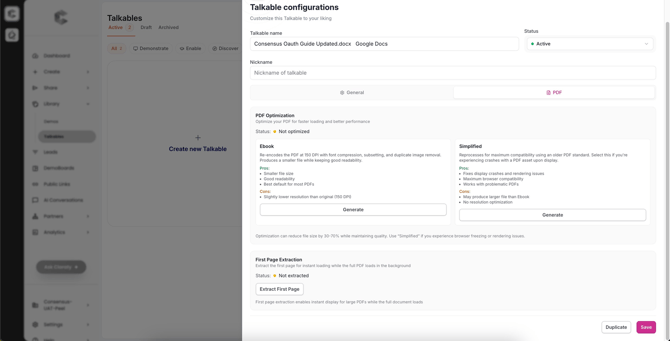
PDF tab in Talkable configurations — optimization modes and First Page Extraction
- Ebook - re-encodes the PDF at 150 DPI with font compression, subsetting, and duplicate image removal. Produces a smaller file while keeping good readability. Best default for most PDFs.
- Simplified - reprocesses for maximum compatibility using an older PDF standard. Select if you're experiencing crashes with a PDF asset upon display.
Optimization can reduce file size by 30–70% while maintaining quality. Use "Simplified" if you experience browser freezing or rendering issues.
First Page Extraction extracts the first page for immediate display while the full PDF loads in the background — ideal for large documents.
Configuring Talkable Settings
Organization-level Talkable settings live under Settings → Talkable Settings. There are four tabs, each controls a different dimension of how your Talkables behave and how the AI represents your company.
|
Tab 1: Organization Info Basic details used across Talkables and Discover. |
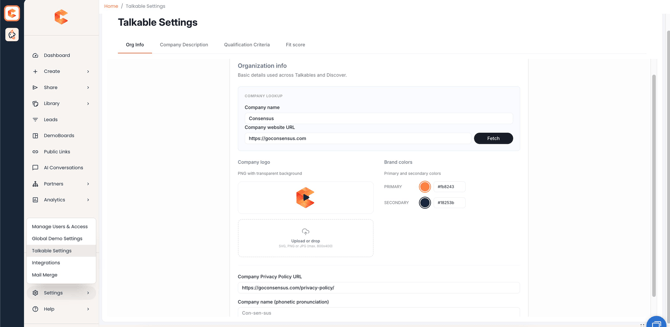
Tab 1: Organization Info — company name, logo, brand colors, and privacy policy URL
Company Lookup
Enter your company name and website URL, then click Fetch - the system will auto-populate your branding information.
- Company name - the display name used across Talkables and the Discover experience
- Company website URL - used to trigger the automated company data fetch
Company Logo
Upload your company logo to appear in buyer-facing Talkable content.
- Accepted formats: SVG, PNG, or JPG
- Maximum size: 800×400px
- Must have a transparent background (PNG recommended)
Brand Colors
- Primary color - the dominant color used in CTAs and highlights
- Secondary color - the supporting accent color
Additional Fields
- Company Privacy Policy URL - linked in all buyer-facing Talkable content
- Company name (phonetic pronunciation) - optional - helps the AI voice pronounce your company name correctly (e.g., "Con-sen-sus")
|
Tab 2: Company Description Company summary used for AI and outreach. |
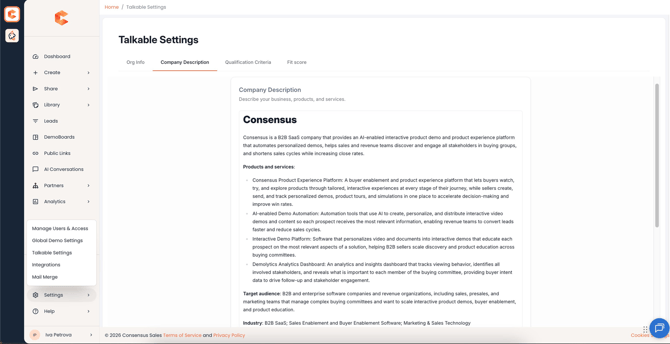
Tab 2: Company Description — the AI's briefing document for all Talkable conversations
This is one of the most important settings for getting the most out of your Talkables. The Company Description is the context your AI agent uses to understand your business — so it can have smarter, more relevant conversations with your buyers.
The Company summary field accepts free-form text. We recommend including:
- Your core platform narrative - what problem you solve and for whom
- Your key differentiators and messaging pillars
- Persona-specific messaging (e.g., how you speak to Marketing vs. Sales vs. Presales)
- Any key phrases or positioning language you want the AI to use
|
Pro tip The more specific your Company Description, the more on-brand your Talkable AI conversations will be. Treat it like writing a messaging brief for a new hire - give it the full picture. |
|
Tab 3: Qualification Criteria Define your ideal client profile and qualification roles. |
This tab is where you define your Ideal Client Profile (ICP). This is used by the AI to qualify buyers in real time during Talkable conversations - helping it understand who is a good fit and tailor its responses accordingly.
The Qualification Criteria field accepts free-form text. Structure it around the following areas:
- Ideal Client Profile - who are your best-fit customers?
- Size & Scale Requirements - what company sizes and team types do you target?
- Technical Requirements - what does a customer need in place?
- Engagement Expectations - what behaviors indicate a strong fit?
- Budget Requirements - any budget considerations or thresholds?
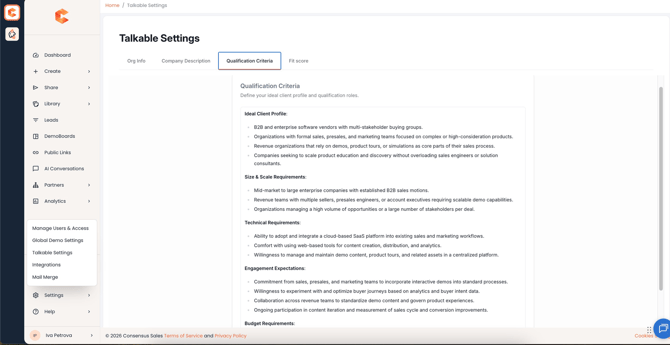
Tab 3: Qualification Criteria — define your ideal client profile
|
Tab 4: Fit Score Configure how the AI evaluates and scores your leads. |
The Fit Score tab lets you configure how the AI evaluates and scores your leads based on their Talkable conversations.
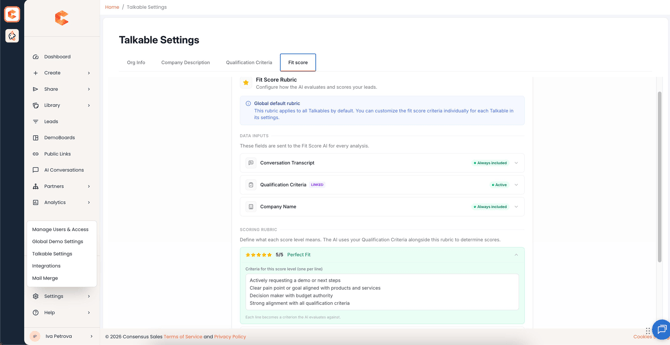
Tab 4: Fit Score — data inputs and scoring rubric for AI-based lead qualification
Data Inputs
These fields are always sent to the Fit Score AI for every analysis:
- Conversation Transcript - always included
- Qualification Criteria - linked from Tab 3, Active by default
- Company Name - always included
Scoring Rubric
Define what each score level means. The AI uses your Qualification Criteria alongside this rubric to determine scores. Each line in the criteria box becomes an individual criterion the AI evaluates against.
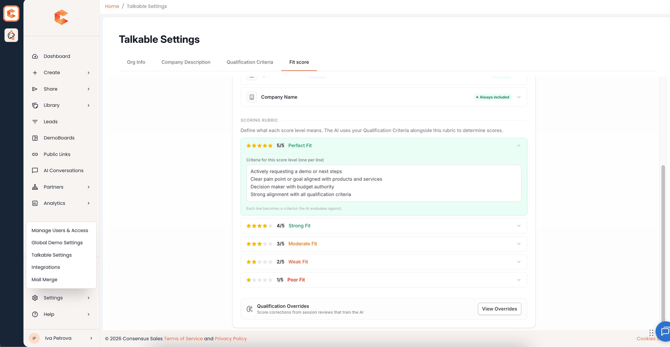
Full scoring rubric — 5/5 Perfect Fit through 1/5 Poor Fit
- 5/5 Perfect Fit - actively requesting a demo or next steps; clear pain point aligned with products; decision maker with budget authority; strong alignment with all qualification criteria
- 4/5 Strong Fit - most qualification criteria met
- 3/5 Moderate Fit - some alignment, some gaps
- 2/5 Weak Fit - limited alignment with qualification criteria
- 1/5 Poor Fit - little to no alignment with ICP
This rubric applies to all Talkables by default (Global default rubric). You can customize the fit score criteria individually for each Talkable in its own settings.
Qualification Overrides
Score corrections from session reviews that train the AI. Click "View Overrides" to see and manage any manual corrections your team has applied.
|
Why this matters The Fit Score criteria directly influences how your Talkable AI qualifies buyers during conversations. The more accurate your definition, the better the AI can identify and engage your ideal customers. |
Per-Talkable Settings
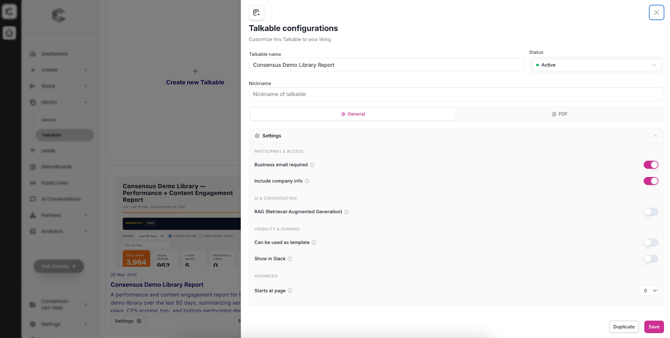
Each individual Talkable also has its own Settings panel, accessible via the Settings gear icon on its library card. This opens the Talkable configurations drawer.
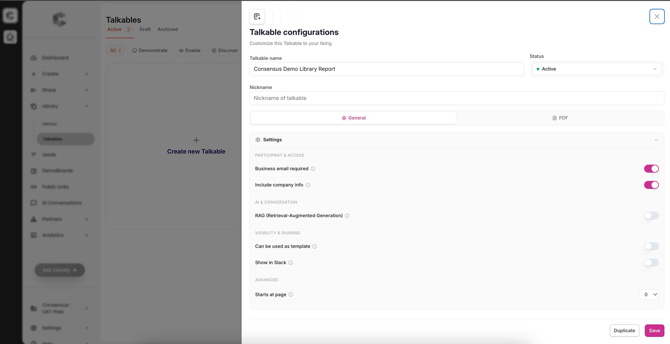
Talkable configurations - General tab with participant, AI, and sharing settings
General Tab
Participant & Access
- Business email required - when enabled, participants must provide a business email address to access the Talkable
- Include company info - when enabled, company information is included in the conversation context
AI & Conversation
- RAG (Retrieval-Augmented Generation) - when enabled, the AI can retrieve and reference additional knowledge from connected sources
Visibility & Sharing
- Can be used as template - allows this Talkable to be used as a template by others in your organization
- Show in Slack - makes this Talkable visible in Slack integrations
Advanced
- Starts at page - configure which page of the document the Talkable opens on (default: 0)
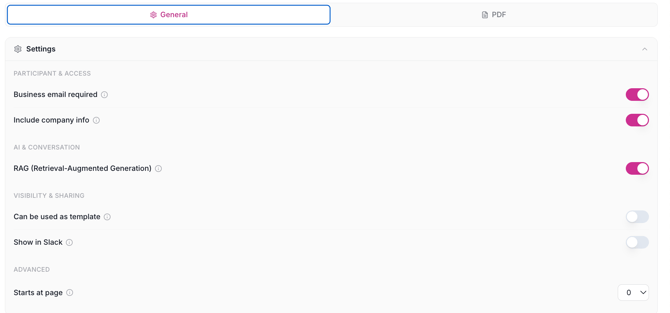
Talkable configurations - General tab
PDF Tab
See the PDF Optimization section above for full details on Ebook vs. Simplified optimization and First Page Extraction.
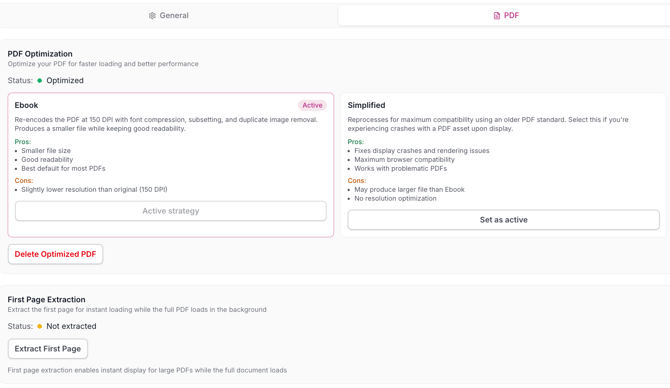
Talkable configurations - PDF Tab
Talkable Performance Analytics
Click the Performance button on any Talkable library card to open the Demo Performance Overview drawer. This gives you a complete picture of how that Talkable is performing.
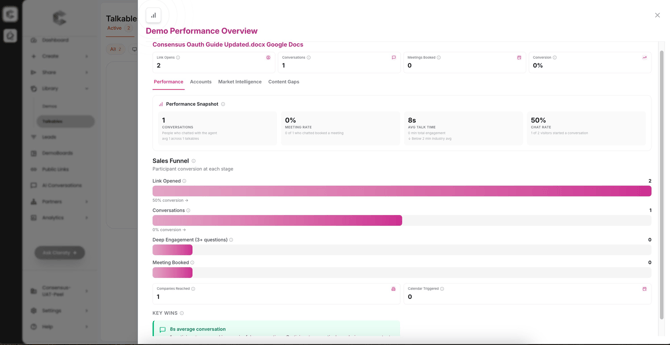
Demo Performance Overview - sales funnel, conversations, and key metrics
Top-Level Metrics
- Link Opens - how many times the Talkable link was opened
- Conversations - number of buyers who chatted with the agent
- Meetings Booked - how many meetings were booked via the agent
- Conversion - overall conversion rate

Performance Snapshot
- Conversations - people who chatted with the agent; avg per talkable
- Meeting Rate - percentage of those who chatted that booked a meeting
- Avg Talk Time - average total engagement duration
- Chat Rate - percentage of visitors who started a conversation

Sales Funnel
Participant conversion at each stage:
- Link Opened
- Conversations
- Deep Engagement (3+ questions)
- Meeting Booked
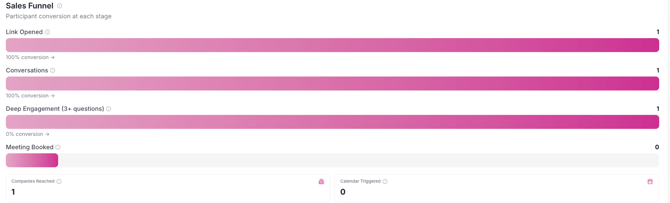
Additional metrics: Companies Reached and Calendar Triggered.

Performance Tabs
- Performance - overview metrics and sales funnel
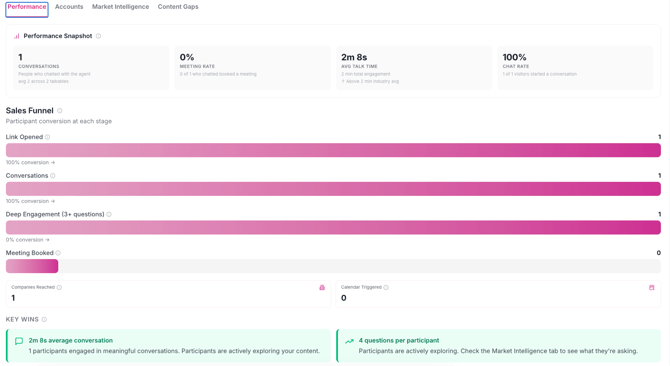
- Accounts - which accounts engaged
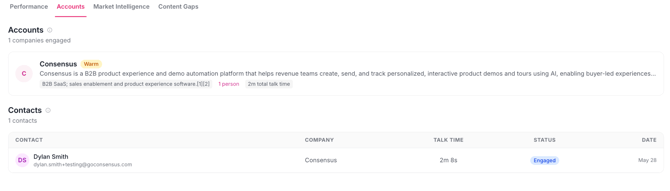
- Market Intelligence - insights about your audience
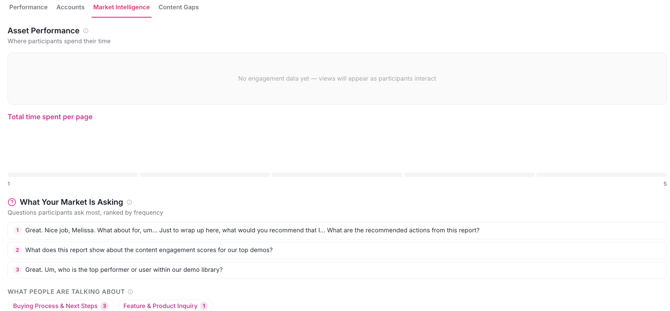
- Content Gaps - topics buyers asked about that your content didn't cover

Understanding Buyer Engagement
One of the most powerful aspects of Talkables is the insight they generate. After a buyer interacts with one, you'll be able to see exactly what happened.
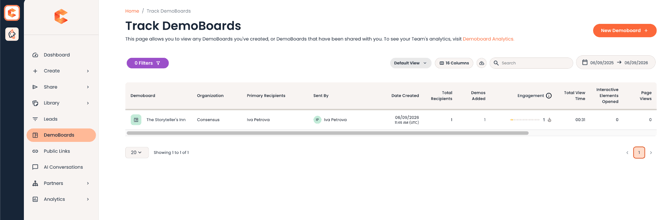
In DemoBoard Session Details
When you review a DemoBoard session, a Talkables section will appear showing:
- Which Talkable the buyer clicked (by name and CTA button text)
- How many times they clicked the Talkable during that session
- A direct link to deeper Talkable analytics via View Talkable Insights
In Lead Details
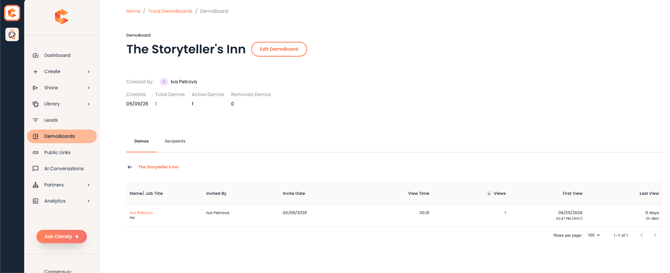
Within an individual lead's record, you can see the full history of their Talkable engagement across all sessions, giving you a complete picture of what content resonated most with that buyer.
AI Conversations
The AI Conversations page (accessible from the left navigation) gives you a centralized view of every Talkable conversation that has taken place across your account, not just per Talkable, but all of them in one place.
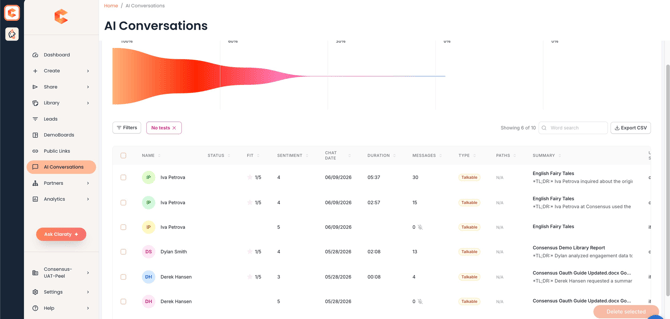
AI Conversations — centralized view of all Talkable conversations across your account
The Funnel Chart
At the top of the page, a funnel visualization shows the overall drop-off across conversation stages, from started to engaged to complete, giving you an at-a-glance sense of where buyers are dropping off.
Filters & Export
- Filters - narrow the list by date, Talkable, status, or other criteria
- No tests - a default active filter that excludes internal test conversations; remove it to include them
- Word search - search across conversations by keyword
- Export CSV - download the full conversation list for offline analysis
Conversation List
Each row represents one conversation and shows:
- Name - the participant's name
- Status - conversation status
- Fit - the AI-assigned fit score (1–5) based on your qualification criteria
- Sentiment - a numeric sentiment score for the conversation
- Chat Date - when the conversation took place
- Duration - total length of the conversation
- Messages - number of messages exchanged; a microphone icon indicates a voice conversation with 0 text messages
- Type - the asset type (e.g., Talkable)
- Paths - navigation path data (N/A for Talkables)
- Summary - an AI-generated TL;DR of the conversation
You can select multiple rows using the checkboxes and use Delete selected to bulk-remove conversations.
Sharing & Distributing your Talkables
Get your Talkable in front of buyers — anywhere they are.
Once your Talkable is active, the real work begins: putting it in front of your audience. Beyond attaching it to a demo, every Talkable has a full Share panel that lets you distribute it via direct links, personalized one-to-one links, QR codes, website embeds, and ready-made social copy.
To open it, click the Share button on any Talkable. The Share panel is organized into four tabs: Share Links, Personalized, Embed, and Social & Copy.
Share via Links
The fastest way to distribute a Talkable is with a direct link. You can choose how much friction buyers encounter before the conversation starts - there are two link modes (what the Buyer experiences):
-
Form - A short entry form (name & email) required before accessing the conversation, best for lead capture and gated content campaigns
-
Verbal form - the AI assistant asks for their name and email by voice during the conversation for a natural, low-friction experience that still identifies the buyer|
Pick the tab that matches your goal, then click Copy to grab the link.
UTM Sources
Want to know which channel drives the most conversations? Add up to 5 UTM sources to any Talkable link (e.g., `linkedIn`, `facebookAds`, `newsletter`). Each source gets its own copyable link with `utm_source` appended, so you can attribute conversations back to the exact channel in your analytics.
-
In the Share Links tab, click + Create UTM source.
-
Type a source name (e.g., `newsletter`).
-
Click the copy button next to it - the link with tracking is copied to your clipboard.
Share via Email
Send the Talkable link directly by email from the Share panel - just enter the recipient's address and click Send Email.
QR Codes
Every Talkable automatically gets a downloadable, brand-styled QR code - it uses your organization's brand colors and logo (configured under Settings → Talkable Settings → Organization Info).
Click Download QR code to save it as a high-resolution PNG. QR codes are ideal for:
-
Trade show booths and event signage
-
Printed one-pagers and leave-behinds
-
Slide decks presented live
-
Product packaging or direct mail
Personalized Links
The Personalized tab lets you create unique, one-to-one links for specific prospects - each with an AI-generated personalized welcome message. When the prospect opens their link, the Talkable greets them by name and tailors the framing to what you know about them. Email links to a single recipient or to a list of recipients.
Two ways to add prospects:
-
CSV upload - import a list of prospects at once (first name, last name, email).
-
Manual Entry - add a single prospect by hand, with optional special instructions for the AI (e.g., "They mentioned integration concerns on our last call").
What you can do with the list
-
Generate Links - each prospect gets a unique personalized URL.
-
Send by Email - dispatch the personalized link straight from the panel.
-
Export CSV - download all personalized links to use in your own email tool or sequencer.
Personalized links automatically carry a `utm_source=personalized` tag, so engagement from these links is clearly attributed in your analytics.
Embedding on Your Website
The Embed tab gives you two ways to put a Talkable directly on your own site - no redirect required. Two options for Embed:
-
iframe - A fully customizable inline experience. Configure it visually with a live preview, then copy the ready-to-paste code. Choose from these 8 presentation styles:
-
Classic - CTA button overlaying your page content best for blog posts and landing pages
-
Card - Self-contained card with thumbnail, brand, and CTA best as any page section
-
Branded - Clean colors + logo, no cover image best for minimal sites
-
Cinematic - Full-bleed hero with glass CTA best as primary page element
-
Editorial - Large headline with inline form best for landing pages and lead capture
-
Gated - Blurred content teaser behind a form overlay best for creating urgency to unlock
-
Panoramic - Slow Ken Burns zoom on your cover image best for drawing the eye with subtle motion
-
Scroll - Auto-scrolling page preview with glass CTA best for PDFs and multi-page content
-
You can also pick the cover image (document thumbnail, first page, a video frame, or a custom upload) and set the button text (default: "Let's Talk").
-
Colors - customize the CTA gradient with a primary and secondary color. It defaults to your organization's brand colors and previews in real time.
-
Size - one-click presets copy the iframe code with correct dimensions:
-
Full page (100% × 100vh) - dedicated Talkable pages
-
Large (100% × 700px) - landing page hero sections
-
Medium (600 × 500px) - two-column layouts and sidebars
-
Compact (400 × 500px) - tight spaces (pair with Card or Branded style)
-
Minimum size: 375 × 500 px - below 375px wide the toolbar wraps; below 500px tall the conversation area gets cramped. Use 100% width for responsive layouts.
-
Auth - control how embedded visitors identify themselves:
-
Fill form to access content - a short form before the conversation starts
-
Ask name & email by voice - the AI collects their info conversationally
-
Fully anonymous - no identification; lowest friction for top-of-funnel
-
-
Card widget - A drop-in web component with one line of code, no iframe sizing to manage. Add the widget script once to your page's `<head>` (the See code dialog provides ready-made snippets for plain HTML, React, and Next.js), then place the widget tag anywhere. The card renders with your Talkable's thumbnail and branding, and opens the full experience on click.
When to use which:
-
iframe - you want the conversation to happen *inside* your page, with full control over style, size, and entry mode.
-
Card Widget - you want a lightweight, branded call-to-action that opens the Talkable, with minimal code.
Social & Copy
The Social & Copy tab helps you announce and protect your Talkable. Two options for this:
-
Private Talkable - Allows a private link to be sent only to the Organizations you’ve granted access to.
-
Suggested Copy for Sharing - Peel generates ready-to-use promotional copy tailored to your company profile and the Talkable's content — so you never start from a blank page:
-
Social posts - variants for LinkedIn, X, Facebook, and a generic version
-
Email - both 1-to-1 (personal outreach) and 1-to-many (newsletter/blast) versions
-
Website Embed - introduction copy to place alongside an embedded Talkable
-
Edit any generated text inline, click Regenerate for a fresh take, and copy with one click. The copy is grounded in your Company Description (Settings → Talkable Settings), so the richer your company profile, the more on-brand the output.
-
Filters - narrow the list by date, Talkable, status, or other criteria
- No tests - a default active filter that excludes internal test conversations; remove it to
include them -
Word search - search across conversations by keyword
-
Export CSV - download the full conversation list for offline analysis
Attaching a Talkable to a Demo
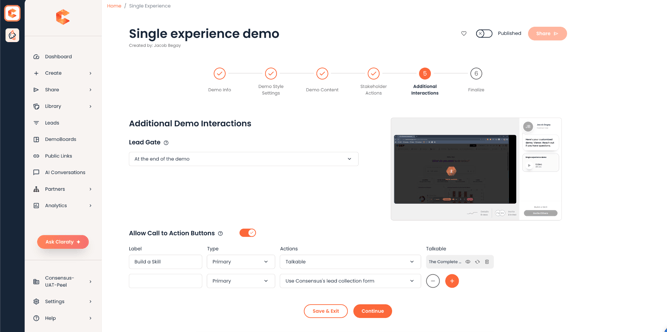
Once your Talkable is Active, you can attach it to any demo in just a few clicks:
- Open the demo in the Demo Builder or detail view and on step 5, find the Talkable panel.

- Click Add Talkable. A search panel will open on the right.
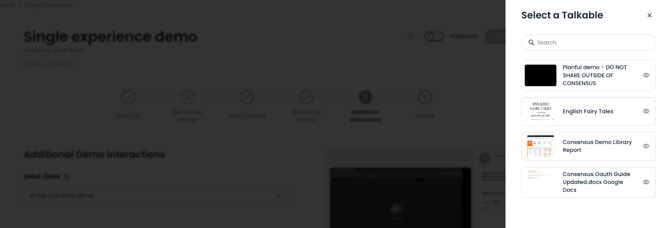
- Find your Talkable — use the View icon to preview it before attaching.

- Click Add to confirm. The Talkable will now appear as a CTA in your demo player.
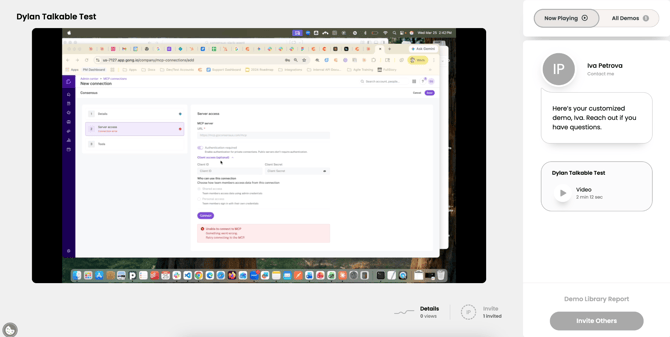
- The button text you've set for the Talkable becomes the link label buyers see in the demo. You can replace or remove a Talkable from a demo at any time without unpublishing it.
|
Hit your Talkable limit? No problem, just move an existing Talkable to Draft or Archive to free up space. The upload screen will surface an option to upgrade your plan if needed. |
Editing After Publishing
Your Talkable remains fully editable after publishing:
- Edit the title at any time via the pencil icon in the builder header
- Replace the source PDF at any time using "Replace PDF" in the Documents panel
- Update settings (assertiveness, skills, voice, etc.) at any time from the builder
- Switch status between Active, Draft, and Archived from the builder header or library card
Enabling Talkables for an Account
Talkables require two things to be enabled before they become available in a Consensus account. Both must be in place - either alone is not sufficient.
1: Turn On the Feature Flag
The feature toggle PEEL_PHASE_1 must be switched ON for the account. This is an internal feature flag that gates access to the Talkables functionality at the platform level.
2: Enable Peel in Keeper Account Settings
In Keeper, navigate to the account and open Account Settings. Scroll down to find the Peel permission and make sure it is checked (toggled on). This grants the account access to the Talkables feature within Consensus.
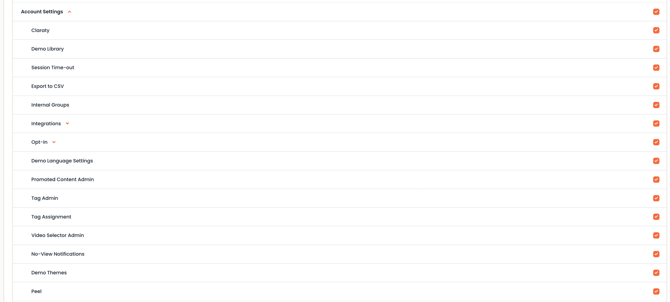
Keeper → Account Settings → Peel — must be enabled for Talkables to be available
|
🔒 For CS & Sales Teams Both the PEEL_PHASE_1 feature flag AND the Peel permission in Keeper must be active for a customer account to access Talkables. If a customer reports that Talkables are not visible, check both of these before escalating. |
Quick Reference
|
I want to... |
Go to... |
|
Browse and manage my Talkables |
Library → Talkables |
|
Create a new Talkable |
Library → Talkables → Create new Talkable |
|
Attach a Talkable to a demo |
Demo Builder → Talkable panel → Add Talkable |
|
See how a buyer engaged with a Talkable |
DemoBoards → [Session] → Talkables section |
|
View Talkable activity for a specific lead |
Leads → [Lead record] → Talkables section |
|
Configure org-level Talkable branding |
Settings → Talkable Settings |
|
Configure company description for AI |
Settings → Talkable Settings → Company Description |
|
Set up qualification / fit score criteria |
Settings → Talkable Settings → Fit Score |
Frequently Asked Questions
What kinds of content can I turn into a Talkable?
Any PDF or Video file works. Common examples: sales decks, first call decks, case studies, product one-pagers, research documents, and G2 review summaries.
Can a buyer go back to the demo after clicking a Talkable?
Absolutely! A "Back to Demos" button is always visible in the top-right corner of the Talkable view - buyers can return to the demo player at any point.
Can I attach more than one Talkable to a demo?
Yes! Multiple Talkables can be attached to a single demo, giving your buyers access to several pieces of supporting content from within the same experience.
Can I update a Talkable after it's published?
Yes - you can edit the title, settings and conversational design at any time. If you need to make significant content changes, you can replace the source PDF and go through the review steps again.
Will Talkables replace human roles?
Not at all. Talkables handle early-stage, repetitive work - qualification, basic education, handling objections, so your sales and presales team can focus on the conversations that really matter. Deals move faster, and you scale your best motions without adding headcount.
Can reps see which Talkables a buyer has engaged with?
Yes. Both DemoBoard Session Details and Lead Details show Talkable engagement data - which Talkable was clicked, the CTA label the buyer saw and how many times they clicked in their session.
How does the Fit Score tab help my AI conversations?
The qualification criteria you define in the Fit Score tab is used by the Talkable AI to understand your ICP in real time. The more accurate your criteria, the better the AI can identify good-fit buyers and tailor its responses during conversations.
What should I put in the Company Description?
Think of it as a briefing document for your AI. Include your core platform narrative, key differentiators, persona-specific messaging and any key phrases or positioning language you want the AI to reflect. The richer the description, the more on-brand your Talkable conversations will be.
What file types are supported for a Talkable?
PDF and MP4 are the primary supported formats. Within the Talkable settings PDF tab, you can further optimize them using the Ebook or Simplified modes for better performance and compatibility.
What is the difference between the Ebook and Simplified PDF optimization modes?
Ebook re-encodes at 150 DPI with compression, best for most PDFs, smaller file size. Simplified uses an older PDF standard for maximum browser compatibility - use this if you experience rendering crashes or freezing.