
Every tour type — Dynamic Screen, Dynamic HTML, Sandbox, and Simulations — starts in the same place: the Consensus Dynamic Tour + Simulation Builder extension for Google Chrome. Capture happens here; all the polishing happens afterward in the editor. This guide walks you through setup, then the capture flow for each experience type, then the fixes for the most common capture hiccups.
| Setup: Install, Pin, Sign In — and Check It’s Active |
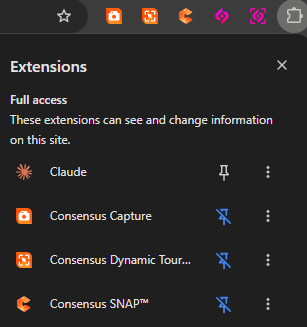
Install the extension from the Chrome Web Store , download extension here, pin it to your toolbar, and sign in by clicking the icon and selecting Sign in — it authenticates with your Consensus credentials, no separate account. Then check it’s active: the icon shows orange when active, gray when off. If it’s gray, open the Consensus web app and enter the tours area first — the extension activates through your Consensus session.
| Walkthrough: Capturing a Dynamic Tour (Screen) |
1. Open your application in Chrome at the screen where your walkthrough should begin.
2. Open the extension and choose Dynamic Tour.
3. In the “Choose what to share” modal, select the browser tab to record.
4. Click the red Capture button, read the on-screen tip (move your mouse smoothly, use the app the way you want it to appear), and click Understood.
5. Use the 3-second countdown to position your cursor by your first click.
6. Demo your product as you would live — every click becomes a tour step.
7. Click the stop icon. Your capture saves and opens for editing.
| Walkthrough: Capturing a Dynamic Tour (HTML) |
1. Open the web app you want to capture and start an HTML capture from the extension.
2. Capture each page you want in the tour. HTML capture records the page itself — not a video — so captured pages stay fully scrollable with real hover states.
3. Capture across multiple pages to build a multi-step guided walkthrough.
4. End the capture; your tour opens in the editor, where each captured page becomes a step you’ll enrich with callouts.
HTML tours appear in the Dynamic Tours list with an HTML badge next to their title so you can tell them apart from screen-capture tours at a glance. (Sandbox Tours don’t use this badge — they have their own section: Library > Sandbox Tours.)
| Walkthrough: Capturing a Sandbox Tour |
1. Open the product or web app you want to turn into a sandbox.
2. Click the extension and start a new Sandbox Tour capture.
3. Click through the flow naturally. Each click captures the next screen and links it to the one before — you’re building a map, not a script. Visit every area you want viewers to be able to reach — for example, capture both the Settings page and the Dashboard so viewers can click either.
4. Click Finish when your capture covers the ground you want. You’ll see a “Finalizing Experience” message while your sandbox is assembled — then you’re redirected straight into the sandbox editor, where the building continues: connecting pages into branching paths, adding more capture sessions, and polishing. Pick up the story in Editing Tours: Callouts, AI Features & Brand Settings. Your sandbox saves to Library > Sandbox Tours.
Because a Sandbox Tour is free-form, coverage beats sequence: capture the screens a curious viewer would click into, not just one happy path.
| Capture Tips From Teams Who Build a Lot of These |
Plan your click path (or click map) first — for guided tours: highlight reel, not documentary; for sandboxes: sketch which areas viewers should reach. Capture at the window size your buyers use — guided tours play back at the recorded aspect ratio. Move deliberately — smooth mouse movement means smooth playback. Use demo data — captures preserve what’s on screen, so capture with sample data rather than real customer records.
| Troubleshooting |
The extension is grayed out / no capture window appears. The extension activates through your Consensus session. Open the Consensus web app, enter the tours area, and check the icon turns orange. If it stays gray: confirm you’re signed in, refresh the tab you’re capturing, and check for a pending Chrome extension update.
My capture count resets or captures disappear. Stop the capture, reload the extension, and retry. If captures keep vanishing at finalization, contact support with the tour link — we track these closely.
Auto-Update didn’t refresh my tour after a UI change. First, a scope check: Auto-Update is available for Dynamic Tours only. For those, it replays your original click path; if the target app’s UI moved substantially, the replay can fail quietly. Open the tour, run Auto-Update manually, and review the result. After a major redesign, a fresh capture is often faster than repairing an old path.
The page I captured looks wrong in the editor. For HTML and Sandbox captures, open the tour in the editor — recent versions include auto-repair for known asset issues. If it still renders incorrectly, send us the tour link.
| FAQ |
Which browsers are supported for capture? Google Chrome — the builder is a Chrome extension. Any web-based application open in Chrome can be captured.
Can I capture a desktop application? Capture works on web-based applications in Chrome. For desktop software, a web-accessible version or demo environment is the way to go.
Can I switch tabs in the middle of a capture? Capture records the single tab you selected, so plan each capture within one tab. For content spanning multiple areas, Sandbox Tours support multi-session capture — record each area in its own session and stitch them on the canvas.
Do my brand colors apply automatically when I capture? Yes, with one nuance: click-target colors lock in at capture time. Set your brand settings before capturing (see the editing guide) and every new capture picks them up.
| Related Articles |
Getting Started with Consensus Tours · Editing Tours: Callouts, AI & Brand Settings · Sandbox Tours