1. To create Tours, go to step 3 of the DemoWizard.

Sample - how Tour is located on a Standard Personalization Demo (above image)
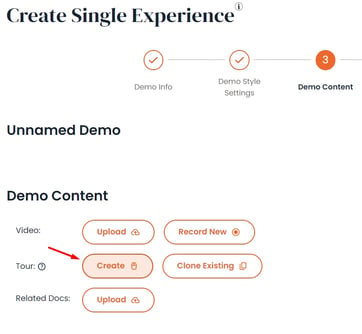
Sample - how Tour is located on a Single Experience Demo (above image)
2. Once you click Create, you either Upload/Drag & Drop multiple screenshots to the builder or use our Consensus Capture extension
Note: To create a multi-pages product tour, we recommend images closer to the suggested 1440px by 1024px size

3. Select the screenshot you want to add the hotspot(s) onto, you will be able to link to the different pages of the tours simply by toggling on the "Link" option. You can now also create a "Button Text" for viewers to navigate through the different pages.

The navigational button will switch to Hotspot with an ![]() arrow icon.
arrow icon.
4. You can easily Rename, Replace, Duplicate or Delete the image by:
a.) hovering over the right side of the image within the lev nav panel (a tool bar will appear
b.) Clicking on the 'Triple dot' button above of the screenshot. You can also reorder your screens by dragging them on the left nav panel.
Once your page has at least one linked page, the left panel will show that your pages were linked. Similarly to the right nav panel, you will now also see ![]() icon next to your linked Hotspot.
icon next to your linked Hotspot.


You can also upload a video to your Greetings and Congrats pop up on the right nav panel.


5. Once everything is completed, go ahead and click "Save" or "Preview" your Tours.
Please note that any pages that were not linked will not be published but can still be saved and configured later on.

You can see when your last tour was saved & updated by going back to the demo builder.

To learn how to clone a tour click here