
how to interact with the ReachSuite dashboard and to create and manage demo flows
Once you are logged in you will be directed to the ReachSuite Dashboard if you close our Dashboard window and need to navigate back to the dashboard after sign in, simply follow the login instructions or if you have the ReachSuite extension installed, you can click the extension and select “Portal”

There are several articles covering the most important sections from the left-hand side panel, such as brand theme settings, integrations, and analytics, feel free to explore these articles now or later
This section will focus on ensuring you understand what is presented in the overview section which covers two main areas:
Interactive Product Tours
When you are logged in you will land on the “Overview” section and you will automatically be defaulted to seeing the Interactive Product Tours that are already built:

These can be filtered by “User” or “Created Date” using the drop downs. We will talk more about the “+ New Interactive Product Tour” button in creating an experience article
Lastly you can create folders by clicking the folders button whenever it is available


From here you will see each previously created interactive product tour has a tile listing out the name, unique id, and creator
You will also see three icons:
- Generate Smart Link Tracking (
 ): This will generate a smart link for personalized tracking, which you can learn more about via the smart link article
 - Favorite (
 ): This will allow you to favorite your most loved tours for quick and easy access, which you can see a group for at the top of the folder hierarchy
 - Version History (
 ): This is the way to access previous versions of your tour that are archived post-auto-update. You can learn more about auto-updating here
The other clickable option is the “![]() ” three dot menu. This will give you access to various options pertaining to the tour:
” three dot menu. This will give you access to various options pertaining to the tour:
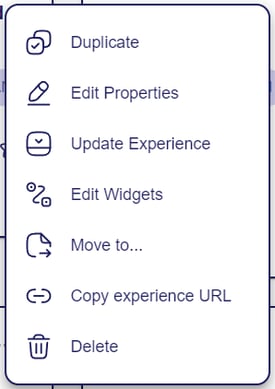
- Duplicate: allows you to create an exact duplicate or copy of that tour
- Edit Properties: allows you to rename the tour
- Update Experience: allows you to make changes to the tour, you can learn more about editing a tour here
- Update Experience: allows prompts our auto-update workflow, you can learn more about auto-update here
- Move to…: allows you to move the experience from one folder to another, or you can simply drag and drop the experience tile into a different folder
- Copy experience URL: copies the go link to your clipboard, this is the link you will want to use for sharing. You can learn more about sharing tours here
- Delete: deletes the experience permanently, we recommend creating an archive folder and moving experiences there before deleting them to be safe
Demos
To navigate to our demo builder or more affectionately called automated discovery, expand the “Overview” options and select “Demos”

From here you will see the demo flows that have already been created. To create a new demo flow, simply click “+ New Demo”
If you want to work with a previously built demo you will see four icons that let you manage your demos:
- Edit Properties (
 ): this will allow you to edit the properties of the demo flow:
- Name
-
- Upload a background image (JPEG)
- Edit Demo Flow (
 ): allows you to enter the demo flow and make changes to it
 - Copy Demo Link (
 ): copies the go link for the demo flow for sharing
 - Delete (
 ): will permanently delete the demo flow
Editing and creating a demo flow use the same user interface so let’s jump into creating a new demo flow by clicking “+ New Demo”

Here you will enter in the name, and upload a background image that will be the backdrop for the automated discovery questions. Once your properties have been set (you can edit them later if needed), you can click “Create”.
Then you will be brought into the demo flow editor:

On the right-hand side there are three categories:
- Items: this houses blocks for email form, questions or full screen or CTA dialogues.
- Experiences: this houses all of your tours and automated sandboxes (coming soon!).
- Demos: this houses other demo flows that can be connected together.
Think of these “content blocks” as building blocks for creating a demo flow. To use them simply drag and drop the blocks into the demo flow backdrop and then begging typing out your questions, answers and then connecting the dots to create a demo flow:
-gif.gif?width=600&height=338&name=5thgif-ezgif-com-video-to-gif-converter%20(1)-gif.gif)
Each demo starts off with a single pre-created Question block. This block cannot be deleted but can be changed to a different item type by using the drop down as shown below. This will allow you to start your product tour off with a welcome message or an “enter your email” address prompt before moving into the product tour or discovery questions

It is important to note, if you choose to require an email address, the session data will integrate into your CRM. You can learn more about our integrations here
On each Question Item block you will have a duplicate button (makes a copy of the questions), a trash can button (deletes the question or answer, depending on the location), and a plus icon (allows you to add answers)
The CTA Dialog block has a trash can icon to delete as well as fields for title text, body text, a CTA, and a URL for the CTA
The Full Screen Dialog block has a trash can icon to delete as well as fields for title text, body text, and a CTA
The Email Form block has a trash can icon to delete as well as fields for the text prompt instructing the viewer to enter the email address and a field to edit the text for the “enter” button

All blocks have dark purple dots on them that are used to connect the blocks. It is important to note that in order to save a demo flow, you must have questions connected to experiences and all answers must have connections to experiences or other questions. There can be no block or answer left unconnected
Pro tip: You can create a placeholder tour that you can have to leverage when building out demo flows like this
Once you are complete with setting up your demo you need to click “Save Demo”