While we don’t think your videos need to be overly produced with advanced animations or a  professional soundtrack, ScreenPal does offer a suite of editing tools that can enhance your video. Among the many editing features available within ScreenPal are a few different overlay features. Text and titles can help viewers understand your message, while shapes and image overlays can help you hold viewers’ attention. Below are some of our favorite overlay features that can help add the right amount of polish to your video.
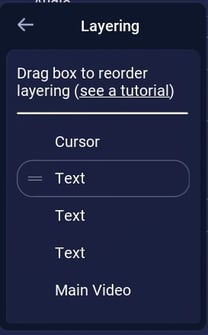
Please Note: When you add an overlay to your recording, it will go on top of previous overlays. For example, adding an image after a shape will result in the image going on top of the shape. You can prevent this by reordering the layers so they don’t unintentionally cover up each other. Select “layering” in the menu of the object. This will pull up a list of all the layers in your video. Then simply click and drag the layer to move it to the top.
Overlay: Image
Select an image from your computer to overlay on top of your video. This is a great way to add a title slide to your video. I was able to create the title slide shown below by taking a screenshot of a PowerPoint slide and overlaying it for the first 4 seconds of the video. Watch a Video: How to Add a Title Page Using Screen Recorder

Overlay: Shape/Arrow
Adding a shape or arrow is a fun, simple way to enhance your video. Choose from circles, squares, stars, equation symbols, or several versions of arrows. After you have placed your shape, you can also edit the color, size, shading, or how it transitions onto the screen. Watch a Video: Shape Overlay Video Tutorial

Overlay: Blur
Are you doing a screen recording of your software platform, but need to blur an area that has sensitive data? Using the blur overlay you will draw a box over the area that you want to be blurred out, and then on the timeline you will determine at what point in the video the box will appear. Watch a Video: Blur Overlay Video Tutorial

Overlay: Highlight
The highlight overlay is a great way to showcase a certain area of your screen. Just like the other overlays, you will draw the area from your screen that you want highlighted, and then mark the spot on the timeline where you want this highlight to appear. You can also add a zoom to ensure your prospect focuses on this section. Watch a Video: Highlight Overlay Video Tutorial

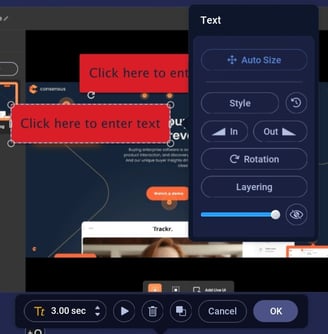
Overlay: Text
Finally, adding text to your video is another simple way to create a title slide for your video or simply engage your viewer in a certain spot of the video. Watch a Video: Text Overlay Video Tutorial
