
You’ve built something great. Now let’s get it in front of buyers — inside a demo, where every view, click, and completed step feeds straight into your analytics.
Good news if you just captured a new Dynamic Tour: the capture flow already wrapped it in a Single Experience demo for you (that’s the wizard you stepped through after finishing). This article is for the other common move — adding an existing tour from your library to any demo you’re building.
| Walkthrough: Adding a Dynamic Tour to a Demo |
1. Open the Demo Builder in Consensus and create or edit a demo. Dynamic Tours work in Single Experience, Standard Personalized, and Flow demos — including demos you’ve already built.
2. Select the Dynamic Tour option in the builder.
3. Find your tour in the right-hand drawer: two tabs, All Dynamic Tours and Favorites. Search or browse, select, and it drops into your demo. (Tour favorites are their own list, separate from Demo Library favorites — your go-to tours stay one tab away.)
4. Personalize the experience for your buyer’s needs.
5. Review and test — click through the demo as your buyer will.
6. Publish and share the way you always do: DemoBoards, public links, or direct sends.
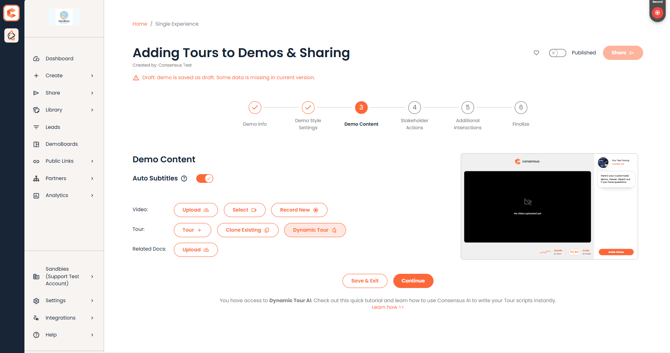
Demo Wizard step 3 Dynamic Tour button
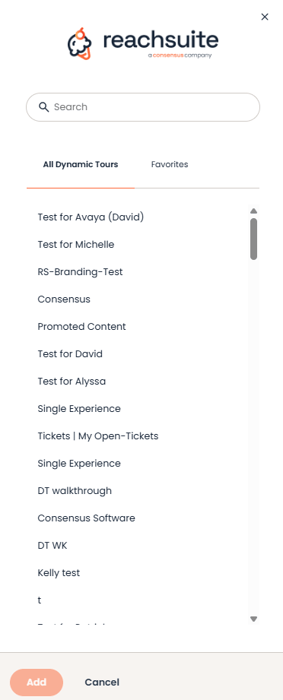
Demo Builder with the Dynamic Tours drawer open
| What About Sandbox Tours and Simulations? |
Sandbox Tours shine in two settings: live calls, where your AE or SE drives the sandbox as the conversation dictates, and buyer-led exploration, where you hand over a personalized environment to explore between calls.
Full Simulations work differently: they can’t currently be added to demos, so they function as standalone experiences — you share a Simulation on its own rather than inside a demo or DemoBoard.
| Why Demos Beat Bare Links |
The library’s Copy URL gives you a direct tour link, and it has its place — a quick internal review, a fast look for a teammate. But for buyers, share through a demo, DemoBoard, or public link instead: tracking (demo-delivered tours report views, time in tour, steps completed, and completion percentage in Demolytics — a bare link tells you far less), context (a tour inside a demo sits alongside your video, docs, and CTAs), and control (content shared outside demos and DemoBoards is harder to govern once it’s forwarded on).
| Sharing With Your Whole Team |
Teammates on Standard roles (Sender/Tracker) can’t browse the tours library — but they can send any demo you share with them. To put tour content in your whole sales floor’s hands: build the tour into a demo, place the demo where the team can access it, and they’re off.
| FAQ |
Which demo types support Dynamic Tours? Single Experience, Standard Personalized, and Flow demos — including demos you’ve already built.
Can I add a tour to an existing demo? Yes. Open the demo in the Demo Builder and add your tour from the drawer.
Can I add a Simulation to a demo? Not currently — full Simulations are standalone experiences shared on their own. Dynamic Tours are what you add to demos.
Can I just send someone the tour URL? You can (Copy URL in the library), and it’s fine for quick internal reviews — but buyer-facing shares belong in demos, DemoBoards, or public links, where you get view tracking, completion data, and context around the tour.
Can I embed a tour in my website? We recommend linking viewers to the experience (for example via a public link) rather than iframe-embedding it — embeds shrink your product into a small window and can hit browser security constraints.
| Related Articles |
Tour Analytics · Managing Your Tours Library · Tours Access, Login & Permissions