
This document describes the functionality released on August 13, 2026.
Included in this Release:
- Talkables
- Engagement Insights
- Custom Public Link CTA Buttons
- Snap Recorder Improvements
- Connecting Your Gmail Account
- Sandbox Tours
- Partner Updates
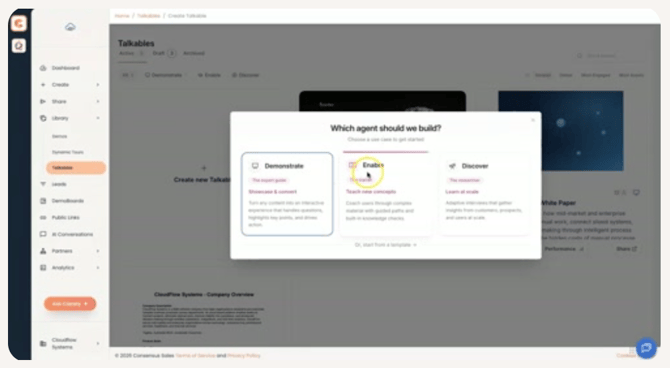
Talkables
What is it?
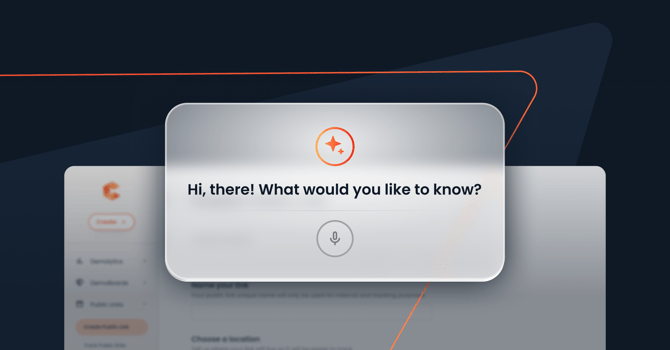
Talkables let your content do the work: answering buyer questions in real time, qualifying their needs, and guiding them toward the next step. With Talkables in Consensus, there is no context switching, no hunting for videos or attachments. Every interaction is captured and surfaced back to your team as meaningful engagement data.
A Talkable is a conversational AI agent placed over your content. Here's what that means in practice:
- Instead of hoping a buyer reads the whole thing, Talkables helps them find the part that matters most to them
- It collects actual buyer signals and zero-party data while they're most engaged
- Content becomes an agent: educating, qualifying and delighting buyers automatically
Availability: Talkables can be shared via a link or as an asset, or a CTA in a demo board. Not available on OCI.
Note: Supported formats currently include PDFs and MP4s.
Resources
Knowledge base article: https://support.goconsensus.com/how-to-create-and-share-talkables
Talkables require an additional license.
Engagement Insights
What is it?
Sellers and marketers currently have to manually dig through raw Demolytics data — view time, feature ratings, reaction timestamps, tour completion — to piece together what a buyer actually cared about in a session. That reconstruction is slow, inconsistent between reps, and doesn't scale for higher-volume, lower-touch motions like marketing-qualified leads, where no one has time to manually review every session.
An "Engagement Insights" section on the Heatmaps page (for both demoboard recipients and Qualified Leads) generates a concise AI summary of a viewer's engagement on demand via a "Generate Insights" button. The summary is presented as 3–4 short cards — covering topics of interest, engagement depth, buyer profile, and any friction points/watch-outs — each grounded in specific facts from the session (reactions, comments, rewatches, tour completion, self-reported Q&A answers), written in plain language. Cards include a thumbs up/down feedback mechanism and a manual regenerate option.
Benefits
- Cuts the time it takes to understand a viewer's engagement from several minutes of manual review to a single glance.
- Surfaces non-obvious signals (e.g., a rewatched section, a specific negative reaction) that are easy to miss scanning raw analytics.
- Standardizes analysis quality across reps regardless of tenure or analytics fluency.
- Speeds up time-to-follow-up.
Set up
This will be enabled for all customers who have the AI Module in Keeper turned on. No additional setup is required by the Admin or users.
How to use
- Navigate to the Heatmaps page for a given lead or demoboard recipient.
- Open the "Engagement Insights" tab (next to Heatmaps & Reactions). This will not be the default tab for both heatmap pages.
- Click "Generate Insights."
- Review the resulting cards; use thumbs up/down to rate quality, or the refresh icon to regenerate.
- Results are stored in session storage. Once generated, they will be shown each time you revisit that heatmap page.
Frequently Asked Questions
Q: Will this work for every session, even ones with very little activity?
A: Yes, but there is a minimum of 10 seconds of view time that needs to be recorded before Insights are able to be generated. If there is not enough data to process the insights, a notice is displayed.
Q: Can I regenerate the insights if I don't think they're accurate?
A: Yes, use the refresh/regenerate control, and use thumbs down to flag it.
Resources
Knowledge base article: https://support.goconsensus.com/engagement-insights
Custom Public Link CTA Buttons
What is it?
CTAs are how demo engagement turns into pipeline. They're the moment a prospect decides what happens next: whether to book a meeting, visit a page or fill out a form. That decision is context sensitive, as the right CTA on a paid landing page might not be the right CTA in a follow up email.
Today, CTA buttons live at the demo level, so every Public Link pointing to that demo shows the same button. Marketers who want to change a CTA for a specific campaign, landing page, or channel have two options: edit the demo directly and risk breaking the CTA for sales reps sharing that same demo, or duplicate the entire demo just to change one button. To help marketers be efficient in their day-to-day work, we have added CTA buttons configuration on the Public Link level.
Public Links can now override a demo's default CTAs without touching the underlying demo. From the Create/Edit Public Link page, users can:
- Add up to 4 CTA buttons scoped to that specific link;
- Set a label, button type (Primary or Secondary), and action (open an external URL, trigger the lead form, or include a talkable) for each;
- Reorder buttons via drag and drop;
- Save changes without affecting the demo's original CTA configuration since the override applies only at the link level.
The same demo can now drive different next steps depending on which link is shared. A "Book a call" primary CTA for a hot lead, a "Read the case study" secondary CTA for a cold, top of funnel share, and no demo duplication required.
Benefits
- Tailor a CTA to the exact context of a share (a campaign landing page, a cold outbound email, a sales follow up) without duplicating the demo
- Keep sales and marketing from stepping on each other's CTA configuration since link-level overrides never touch the source demo
- Cut down on demo sprawl caused by copying entire demos just to test a different button
Set up
No admin setup is required. The Customize CTAs section appears automatically on the Create/Edit Public Link page for all users with public link creation access.
How to use
- Go to Create Public Link (or edit an existing one).
- Under Additional Option in the right hand column, click on the Customize CTAs section.
- If CTAs have been created in Demo Builder, the user will see all of these displayed and these can be changed without impacting the demo configuration
- If no CTA buttons have been configured in Demo Builder, the user can start adding CTAs for their Public link and these won't apply on the demo level.
- Click Add CTA to create a button, up to 4 per link.
- For each CTA, set:
- Label (the text shown on the button)
- Type (Primary or Secondary)
- Action (open an external URL, trigger the lead form or add a talkable)
- Drag and drop to reorder buttons if you've added more than one.
- Click Save and go back to create your Public Link.
- The CTA buttons configuration is applied only when the Public Link is saved. From that moment on your buyers will see only the CTA buttons you configure on the Public Link level.
- The CTAs apply only to this Public Link; the demo's own CTA configuration is untouched.
- On the Public Link Details page your CTA configuration is included in the pop up for Link Details, where all configuration options are listed.
Frequently Asked Questions
Q: Does this change the CTAs on demos I've already shared?
A: No. The override only applies to the specific Public Link where you configure it. The demo's own CTA configuration and any other links carrying the demo, stay exactly as they were.
Q: What happens if I don't set any CTAs on the link?
A: The Public Link will use the CTA buttons configuration that is set in the Demo Builder.
Q: Can I use this on a Public Link I've already created, or only new ones?
A: Both. Edit an existing Public Link and click the Customize CTAs section. The CTA configuration from Demo Builder is applied, but it can be now changed on the link level.
Q: Do I have to configure CTAs on every Public Link or can I apply the same override to several links at once?
A: Each Public Link is configured individually. There's no bulk apply across multiple links.
Q: Can I configure CTAs on DemoBoards or is this available only in Public Links?
A: The CTA buttons customization is available in Public Links only.
Resources
https://support.goconsensus.com/where-do-i-get-the-publiclink-for-my-website
https://support.goconsensus.com/what-call-to-actions-should-i-use-for-mydemo
https://support.goconsensus.com/how-to-create-public-links-for-marketing-
Snap Recorder Improvements
What is it?
Snap's recorder was missing the basic controls users expect from tools like Loom and Vidyard — no pause/resume, no background customization, and no reliable quality controls. A five-minute video often took 30+ minutes to record because a single mistake meant starting over.
- Redesigned recorder UI – A cleaner, more intuitive pre-recording screen, rebuilt to the new Figma design.
- Persistent camera & mic settings – The recorder remembers your last-used camera and microphone and auto-selects them next time, with the option to change devices manually.
- Available controls during recording – Pause recording mid-take without losing progress, then resume from that point. The final video stitches the before- and after-pause footage together.
- Background blur and virtual backgrounds – Choose a blur or a virtual background so recordings look professional from any environment; the choice persists with other session settings.
- Auto-detected video quality – The recorder automatically selects the best resolution and bitrate for your hardware and connection, with a manual override available. The setting persists between sessions.
- Video gets lost after recording – Implemented a critical bug fix where your video gets lost after recording.
Benefits
- Record a five-minute video in five minutes, not 30+, since one mistake no longer means starting over.
- Live controls during video recording (pause, resume, stop)
- Look camera-ready from any environment with background blur or a virtual background.
- Get the right video quality by default, with the recorder auto-detecting the best setting for your setup.
- Persistent camera & mic settings for spending less time reconfiguring camera and mic every time the recorder opens.
Note: PIVs in the web app are recorded using the same recorder, so the benefits apply to them as well.
Set up
No admin setup is required. The improved recorder is available to all users with Snap recording access and to all users recording PIVs in the web app.
How to use
- Open the Snap recorder as usual. The redesigned pre-recording screen shows your camera and mic, auto-selected from your last session, plus a background option.
- Choose a background blur or virtual background before you start, if you want one.
- Confirm quality — the recorder auto-detects the best setting, or you can override it manually.
- Start recording. Use the live controls to Pause to stop mid-take without losing footage and Resume to continue; use Stop when you're done. The controllers are implemented as Picture in Picture and are treated as a separate window. Due to this the behavior is as follows:
- If you choose to share the current tab or window, the controller will not be part of the recording and won't be visible in the video output.
- If you choose to share your full screen, the controller will be visible in the final video output.
Frequently Asked Questions
Q: Do I need to change any settings to use the new recorder?
A: No. Your camera, microphone, and quality preferences carry over automatically after your first session.
Q: Can I blur or change my background?
A: Yes. Background blur and virtual background options are available in the recorder before you start.
Q: What happens to my video if I pause partway through?
A: Nothing is lost. Pausing keeps your captured footage, and resuming continues recording — the final video includes everything from before and after the pause.
Q: Are you planning any advanced editing capabilities (remove filler words, background noises, transcript editing)?
A: Yes, we are in the process of modernizing our recorder and these are part of the roadmap.
Resources
- https://support.goconsensus.com/recording-a-personal-video-consensus-snap
- https://support.goconsensus.com/recording-personal-introduction-video-piv-with-consensus-snap
Connecting Your Gmail Accounts
What is it?
Sales reps live in Gmail, but reaching their buying committee has meant leaving Consensus to find an email address, then leaving Gmail to track engagement. There was no secure way to connect a Gmail account to Consensus, search Gmail contacts, or act on them without copying information between tabs. This initiative lays the groundwork for email-based engagement directly inside the product, starting with a secure, per-user OAuth connection and contact search.
- Secure Gmail OAuth connection – Users can securely connect their own Gmail account through an OAuth flow, with token exchange, refresh, and error handling managed on the backend.
- Gmail Integration tile – A dedicated tile in the Integrations area where users start authentication and manage their connection.
- Gmail contact search – Users can search their own Gmail/Google contacts by first name, last name, or full name directly within Consensus workflows.
- User-scoped visibility – Gmail is a per-user integration: a user's connection is visible only to that user, not exposed to the rest of the organization.
- Outbound email sending via Gmail — Composing and sending a message through a connected Gmail account from within Consensus.
Benefits
- Connect a Gmail account to Consensus in a few clicks, with a secure, standard OAuth flow — no shared credentials or manual setup.
- Find the right stakeholder fast by searching Gmail contacts directly inside Consensus workflows instead of switching tabs.
- Keep a personal Gmail connection private — it's visible only to the person who connected it, not the whole org.
- Compose and send email directly through a connected Gmail account without leaving Consensus, so outreach and follow-up happen in the same place engagement is tracked.
Set up
No special admin setup is required.
How to use
- Go to the Integrations area and find the Gmail tile.
- Click to connect and complete the Google OAuth authorization.
- Once connected, search your Gmail contacts directly within the DemoBoard creation workflow.
Frequently Asked Questions
Q: Can I send emails through Gmail from Consensus yet?
A: Yes, there's going to be a new share modal that allows you to insert your thumbnail, link or button and send it through Gmail from Consensus.
Q: Will other people in my organization see that I've connected my Gmail account?
A: No. Your Gmail connection is private to you.
Q: What contacts show up when I search?
A: Your own Gmail/Google contacts — search matches by first name, last name, or full name.
Q: Which workflows will have the contact search available?
A: You can select from your Gmail contacts list when choosing recipients for your DemoBoard in the web application.
Resources
Knowledge base article: https://support.goconsensus.com/connecting-your-gmail-account
Sandbox Tours
What is it?
Build interactive, non-linear product sandboxes in minutes. No engineering, no implementation, freely navigable in any direction the end users desire. Buyers — and sellers — explore wherever you want in a controlled, personalized, reliable sandbox environment.
Sandbox Tours is a new simulation experience type in Consensus. It uses our HTML Capture technology to record screens of your product directly from your browser, then stitches them together into a multi-path sandbox that buyers or sellers can navigate freely.
Unlike a Dynamic Tour HTML, which guides a viewer down a single scripted path with callouts, a Sandbox Tour lets the viewer click in any direction the screen offers. That makes it the right tool for:
- Live discovery demos – let the conversation drive where you click, instead of being locked into a fixed path.
- Buyer-led POCs and self-guided demos – give prospects a safe, fully personalized environment to explore on their own time and replace the long, laborious set up costs of POCs.
- Reusable sandboxes – record once, then re-theme or translate the underlying data with a single AI prompt for any vertical, persona, or language. Think personalizing a sandbox to be healthcare or spanish or microsoft themed.
Because Sandbox Tours use the same HTML Capture engine as Dynamic Tours HTML, every captured page preserves the real look and feel of your web app: fully scrollable, with authentic hover states.
Sandbox Tours lives in the simulation library alongside your other simulations, marked with an <HTML> badge, and has its own dedicated dashboard view.
What's Included with a Sandbox Tour
- Browser-based HTML capture with the Consensus Chrome extension
- A visual drag-and-drop editor on an infinite canvas
- AI data editing — rewrite all underlying data with one prompt (Example: personalizing a sandbox to be healthcare or spanish or microsoft themed.)
- Image swap — replace any captured image with your own (make the sandbox feel like the prospect's own)
- Multi-session capture with color-coded pages so you can see what came from where
- Free-form playback with on-screen guidance for end users
Sandbox Tours vs. Other Consensus Experiences
|
Capability |
When to use it |
|
Sandbox Tours |
Live demos and self-guided exploration where the end user can drive freely |
|
Dynamic Tours HTML |
Guided walkthroughs where the story matters and you want to script the journey |
|
Full Simulations |
Deep, fully integrated product replicas with backend behavior |
Most customers use Sandbox Tours and Dynamic Tours HTML, depending on the use case, with simulations reserved for power user customers.
Set up
Step 1: Confirm your license
Sandbox Tours is included with Tours and Simulations licenses at no additional cost. If you don't have either, contact your Consensus account team to upgrade.
Step 2: Assign builder permissions to appropriate users
An admin will assign the Consensus Admin, Consensus Content Author, Content Manager, Public Link Manager, or Dynamic tour creator role to anyone on your team who needs to build sandboxes.
Step 3: Install the Consensus Chrome extension
If you haven't already, download and pin the Consensus Chrome extension to your browser bar & be sure to pin it so it's close to your work!
Step 4: Log in to the ReachSuite side bar
Open the Consensus web app, then use the icon in the left sidebar to enter the ReachSuite portal. This activates the Chrome extension. The extension icon turns orange when active. If it's grey, the extension is off.
You're ready to build.
How It Works
Capture your sandbox
- Open the product or web app you want to capture.
- Click the Consensus Chrome extension and start a new Sandbox Tour capture.
- Click through the flow naturally. Each click captures the next screen and links it to the previous one.
- End the capture when you're done. Your sandbox automatically opens in the visual editor.
The extension captures full HTML, so every page is fully scrollable and preserves the real hover states from your app.
Edit your sandbox
The visual editor displays every captured page as a connected node on an infinite canvas, similar to building a Discovery Demo. You can always re-configure which pages go where.
From here, you can:
- Re-link pages to design any path you want a viewer to be able to take.
- Add new captures to an existing sandbox. New pages appear color-coded by capture session so you can see at a glance which screens came from where.
- Personalize using the AI data editor — open the editor, type a prompt like "Change all data to be healthcare-themed in Spanish," and Consensus rewrites every text element across the entire sandbox in one pass.
- Swap images — replace any captured image with your own. Upload the prospect's logo, swap in industry-specific visuals, or remove anything that shouldn't be there.
What end users experience
When someone plays a Sandbox Tour, they can click any element on the screen that's been linked. If they click something that isn't linked — for example, a menu item you haven't captured yet — the player highlights all the available paths for one second so they know where they can go next.
This means there's no dead end. Viewers always know what's clickable, and they can take whichever path the conversation or their curiosity leads them down.
What you can't edit
To preserve the integrity of the captured product, a few elements are locked. You cannot edit charts, graphs, or hard-coded items like checkboxes, pencil edit icons, and placeholder text inside form fields. This matches Dynamic Tours HTML behavior.
Best Practices
- Capture the path that matters most first: Don't try to capture every screen in your product on the first pass. Start by capturing the two or three flows your buyers ask about most. You can always add more capture sessions later.
- Use AI data editing instead of re-recording: When a new vertical, persona, or language comes up, don't re-capture the sandbox. Open the AI data editor and rewrite the underlying data with one prompt. This is the single biggest time-saver in Sandbox Tours.
- Personalize with image swap before high-stakes demos: Swap in the prospect's logo, replace generic dashboard charts with industry-specific visuals, and remove anything that doesn't match the conversation. A 30-second image swap turns a generic sandbox into something that looks like the prospect's tenant.
- Use Sandbox Tours for live demos, Dynamic Tours for async storytelling: If you're presenting live and want to follow the conversation, use a Sandbox Tour. If you're sending a self-paced walkthrough where the story should unfold in a specific order, use a Dynamic Tour HTML. Both are the right tools — for different jobs.
- Watch for unlinked elements during QA: Before sharing a Sandbox Tour externally, play it yourself and click around. Anywhere the path you expected isn't available, the editor flags the unlinked element so you can fix it before a buyer hits a dead end.
Resources
Knowledge base article: https://support.goconsensus.com/sandbox-tours
Partner Updates
Trumpet: Trumpet is adding our MCP Server to their marketplace in the app.
Trupeer: Our partner Trupeer recently rolled out a major platform update, including Organizations & Workspaces for enterprise account management, expanded Document Skills for generating more content types, multi-input/multi-output generation, a new document editor, and a batch of video editing upgrades.